# Returns Customer Service
In the space.vars.Product\_pLApp, you will be able to:
* Find and access data for tracked return parcels.
* Review email notifications and attachments that have been sent to your customers.
* Process return service requests for returns registered using your space.vars.Product\_ReturnsPortal.
* Accept or reject return requests submitted in your space.vars.Product\_ReturnsPortal. For further details, see our return approvals documentation.
{% content-ref url="returns-customer-service/return-approvals" %}
[return-approvals](https://docs.parcellab.com/docs/retain/returns-customer-service/return-approvals)
{% endcontent-ref %}
## Trackings: How to view return trackings
In cases where you need to retrieve additional information for a customer, such as the delivery status of their return, here’s how you can use the space.vars.Product\_App’s search functionality on the [App Dashboard](https://app.parcellab.com/) and in the [Trackings module](https://app.parcellab.com/trackings).
Find a return tracking
To find a return tracking:
1. In the search field of the [Trackings module](https://app.parcellab.com/trackings), fill in any part of the order data associated with the parcel.\
The following information can be used to search for a parcel:
* Tracking number
* Order number
* Delivery number
* RMA ID
* Delivery address
* Recipient’s name
* Recipient’s email address
Among the results that display, your search query will be highlighted in the tracking record. In the following example, the tracking number was entered into the search field.
2. Click on the listed tracking.\
The detailed tracking record will display, where you can retrieve the full details of the tracking.\
Each detailed tracking record consists of the following parts:
* An overview of the tracking information
* Clickable buttons to view detailed tracking information
* If the return was registered through your space.vars.Product\_ReturnsPortal, the available documents (for example: return labels and packing slips) that were generated for the return.
* The status updates retrieved from the carrier
* The notifications sent to the customer
{% hint style="info" %}
To enhance your search results, you can enter more than one type of search term (for example: combining a partial tracking number and recipient’s name). The search results displayed will include tracking records that contain any of the search terms used.
{% endhint %}
Save filtered views for return trackings
If you need to retrieve additional information on a customer’s return, here’s how you can use the space.vars.Product\_App’s filters to narrow your search. You can use the filters in the space.vars.Product\_Trackings module to create customized views for return tracking records.
To filter for return tracking records:
1. Click the **Add filter** button in the Trackings module.
A drop-down menu will display a list of available filters.
2. To filter for all return trackings, enable the **Return delivery** filter.
3. To filter for return trackings registered via your Returns Portal, enable the **Is return portal** filter.
4. To save the filtered view, click **Save new view**.\
The filtered view for return trackings is saved and can be easily accessed underneath the search bar in the Trackings module.
{% hint style="info" %}
Return trackings generally have the Return tracking type. Returns registered through the parcelLab space.vars.Product\_ReturnsPortal have the Return Registration tracking type.
{% endhint %}
## Trackings: Manage return tracking details
Returns registered using the space.vars.Product\_ReturnsPortal have a dedicated tracking record details page that includes RMA data, any attachments (for example: return labels and QR codes), and information on the items registered for return and items selected as part of uneven exchanges. For Shopify returns, clickable links to the draft order and like-for-like exchanges are also available. These tracking records can be identified in the Trackings list by the Return Registration type, and you can request to export return tracking data using the filters.
Process Refund and Exchange (Shopify only)
{% hint style="warning" %}
This feature is only available for retailers using Shopify and parcelLab’s space.vars.Product\_ReturnsPortal.
{% endhint %}
To process a refund or exchange for a registered return:
1. Click **Actions** on the return tracking record.
A drop-down list of available actions will display.
2. Select **Process return (refund and exchange)**.
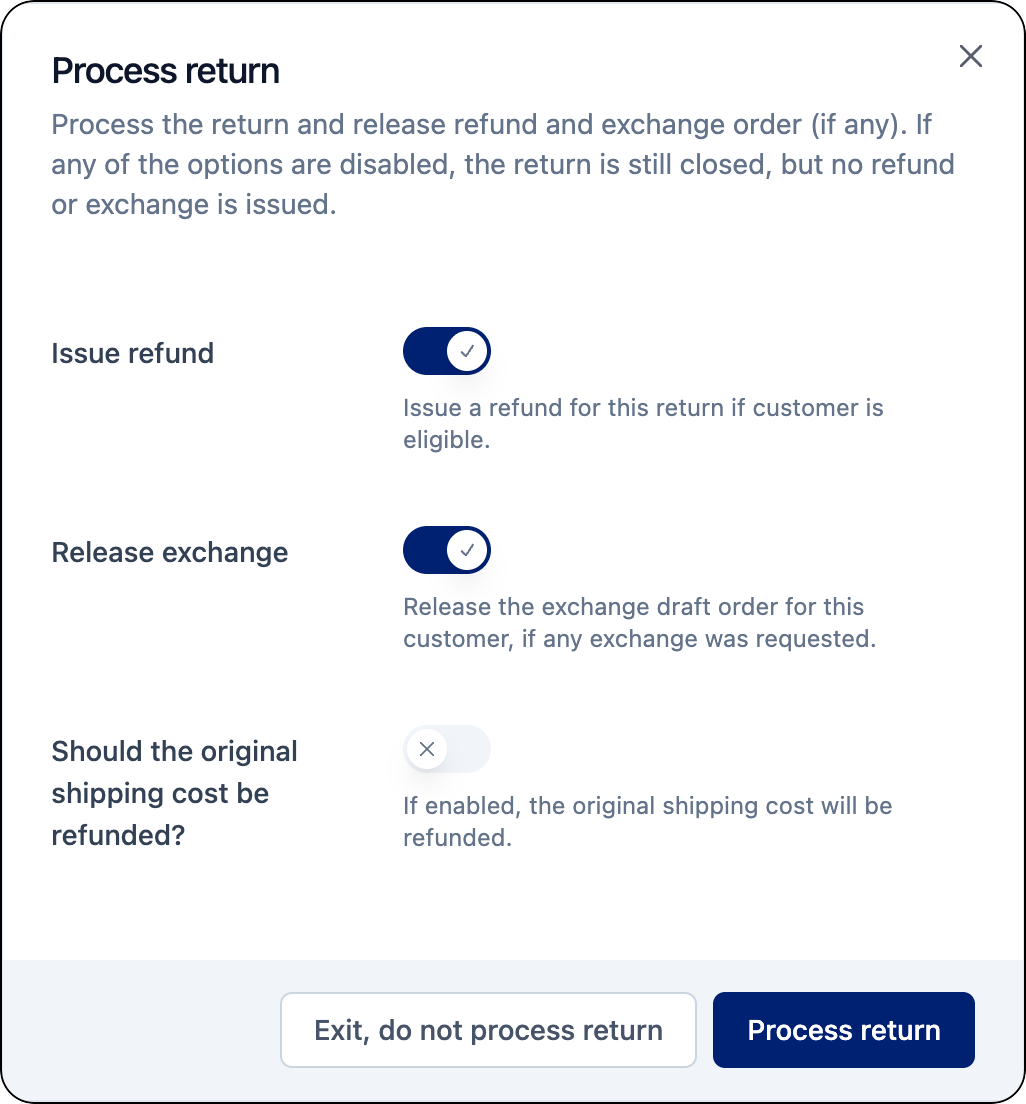
A pop-up window will display to allow you to initiate a refund and/or exchange for the tracking.
3. Do one or more of the following:
1. Turn on the **Issue refund** toggle to issue a refund for the return.\
This will trigger the refund process from Shopify.
2. Turn on the **Release exchange** toggle to initiate an exchange for the return.\
This will release the draft order so the exchange can be fulfilled.
3. Turn on the refund shipping cost toggle to refund the original shipping cost.\
This will refund the original shipping fee charged for the order.
4. Click **Process return**.\
The refund and/or exchange is processed.
Cancel return and label (Shopify only)
{% hint style="warning" %}
This feature is only available for retailers using Shopify and parcelLab’s space.vars.Product\_ReturnsPortal.
{% endhint %}
Returns registered in the space.vars.Product\_ReturnsPortal can be cancelled in the Trackings section of the space.vars.Product\_App. Cancelling a registered return also invalidates the label that was initially created at the point of return registration containing pre-filled information (for example: return address, tracking number, and barcode) to send items back to the seller.
To cancel the registered return and label:
1. Click **Actions** on the return tracking record.
A drop-down list of available actions will display.
2. Select **Cancel return and label**.
A pop-up window will display asking you to confirm the cancellation.
3. Select a reason for cancelling the return from the drop-down list.
4. Click **Cancel return**.\
The return and return label is cancelled.
Create additional return label
Additional labels can be created for returns registered using the space.vars.Product\_ReturnsPortal. Creating an additional label will create a new return tracking record. The new return label will be available to download in the original return tracking record.
{% hint style="info" %}
To use this function, the [Request Multiple Labels feature](https://docs.parcellab.com/docs/retain/returns-portal/features/request-multiple-labels) must be activated for your space.vars.Product\_ReturnsPortal.
{% endhint %}
To create an additional label for a return tracking:
1. Click **Actions** on the return tracking record.
A drop-down list of available actions will display.
2. Select **Add another label to return**.
A pop-up window will display to allow you to create an additional label.
3. In the **Weight** field, enter the weight of the return package.
4. In the **Measurement** field, select the measurement unit from the drop-down list (that is: grams or pounds).
5. Click **Create additional return label**.\
A new return label is created and is available to download on the pop-up window.
Add return tracking number
If customers are required to buy their own return label, the corresponding tracking number can be manually added to the return tracking record in the space.vars.Product\_App. Any configured return communications will be sent for the return tracking after it has been added to the tracking record.
To manually add a tracking number:
1. Click **Actions** on the return tracking record.
A drop-down list of available actions will display.
2. Select **Add tracking number manually**.
A pop-up window will display allowing you to add the tracking number and carrier.
3. In the **Tracking Number** field, enter the tracking number.
4. In the **Courier** field, select the carrier from the drop-down list.
5. Click **Add tracking number**.\
The tracking number is added to the return tracking record.
Export return tracking records
You can request a file containing all return tracking records. The export will contain all trackings within the specified date range along with their latest status updates and time stamps.
To request a data export of return trackings:
1. Click the **Add filter** button in the space.vars.Product\_Trackings module.
A drop-down menu will display a list of available filters.
2. To filter for all return trackings, enable the **Return delivery** filter.
3. To filter for return trackings registered via your Returns Portal, enable the **Is return portal** filter.
4. Click the **Export** button on the Trackings page.\
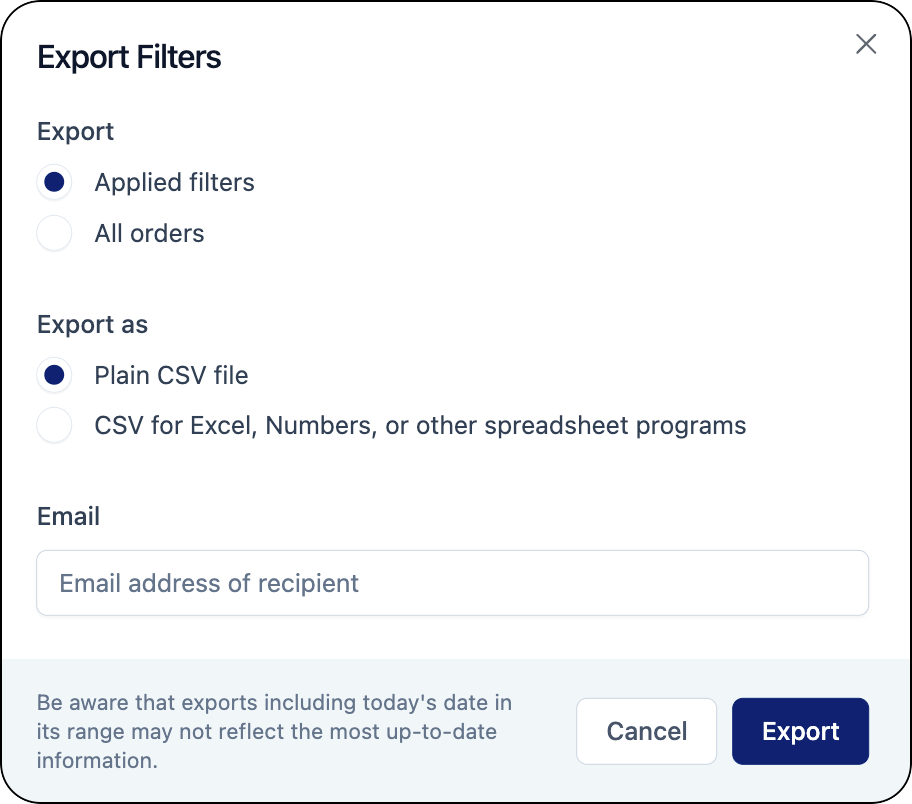
The Export Filters window will display.
5. In the **Export** section, select **Applied filters**.
6. In the **Export as** section, select the file format in which you want to receive the report.
7. Enter the email address that the export will be sent to.
8. Click **Export**.\
After clicking **Export**, a pop-up will display saying that the export was successfully requested. Once the export is complete, you will receive an email with a link to download the file.
{% hint style="info" %}
Since personal data is deleted after 90 days, trackings that are older than 90 days will be included in the report but without any personal information. For more information, refer to the [Data Export](https://docs.parcellab.com/docs/platform/overview/data-exports) documentation.
{% endhint %}
## Communication: Manage return communication records
In the Communication module, you can view messages sent for specific return statuses and export return communication records for a particular communication channel.
View return communications
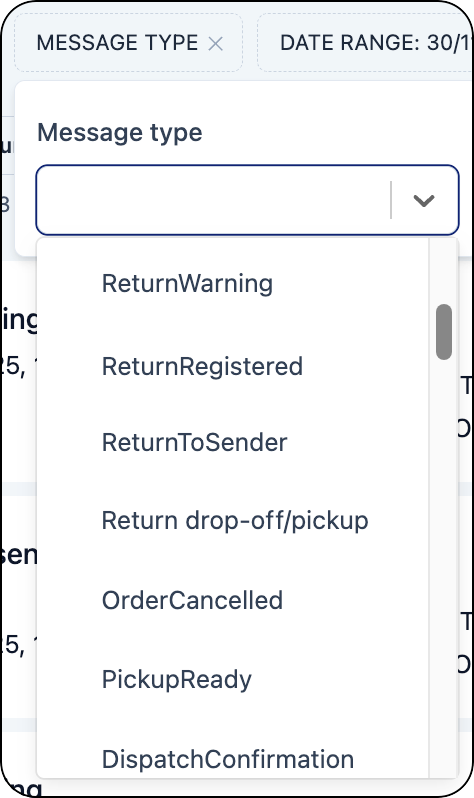
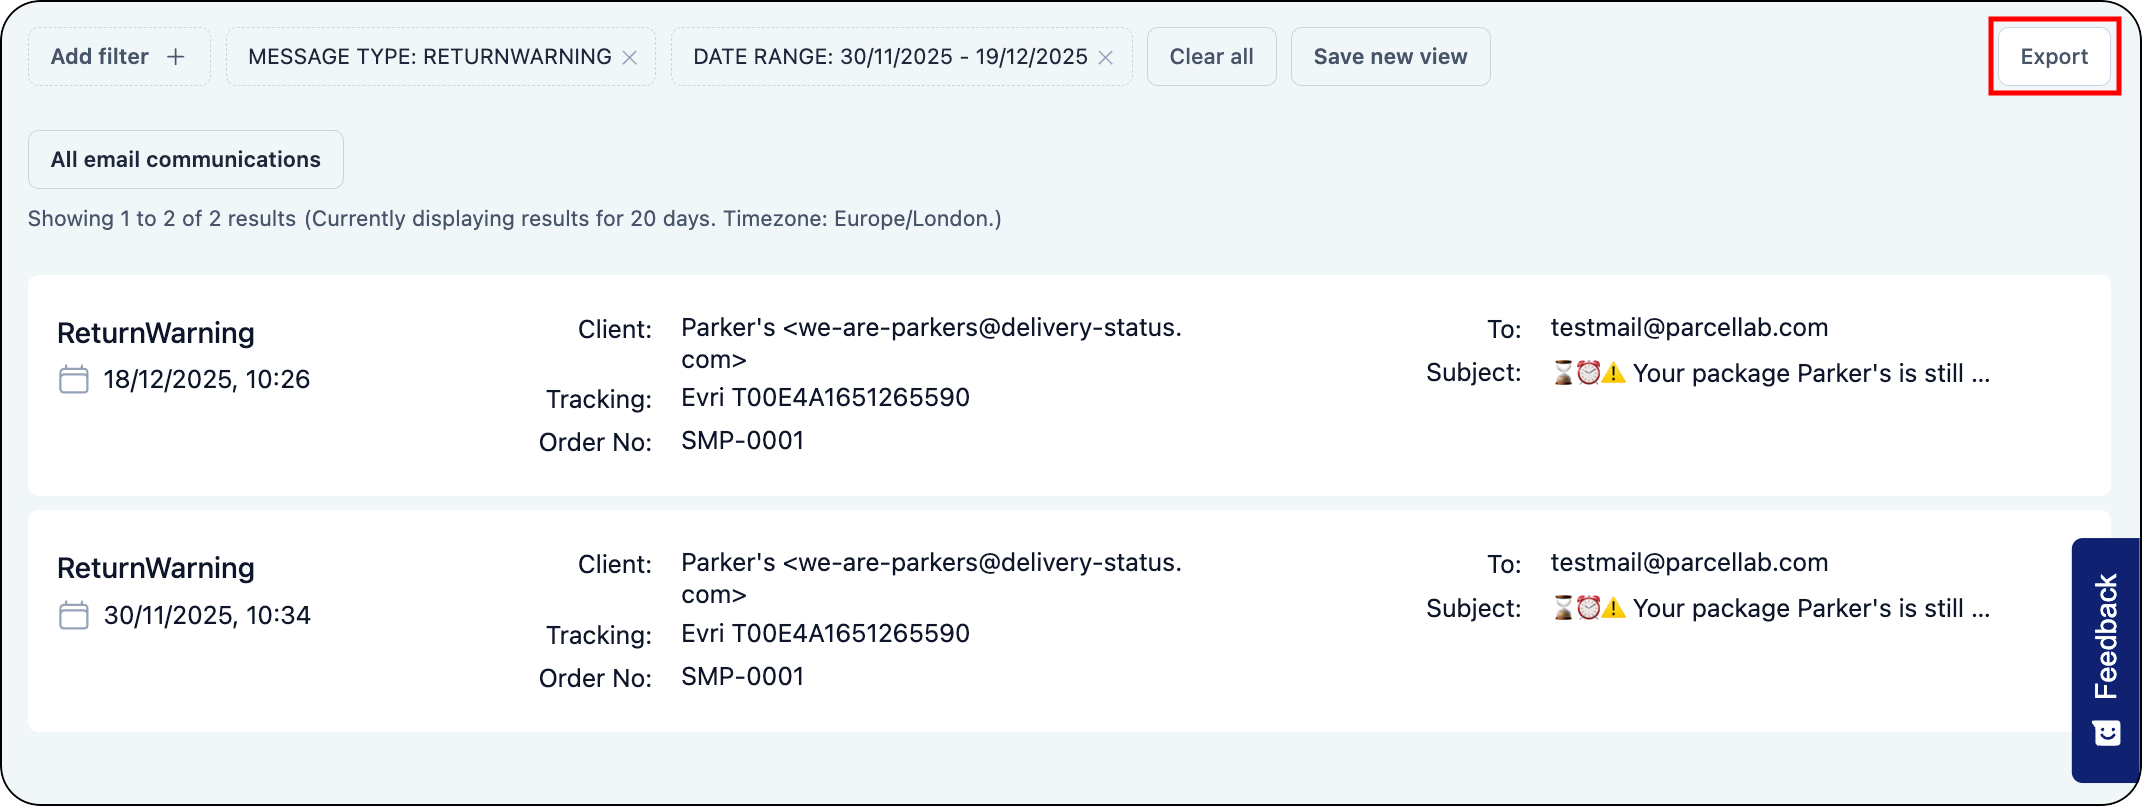
You can use the **Message Type** filter to search for configured messages that were sent for returns. The search results will display communication records for the selected Return message types and the options to display the email as seen from the recipient’s point of view and the detailed tracking record associated with the message.
Export return communication records
You can request a file containing all return communication records by communication channel (that is: email or SMS).
To request a data export of return communication records:
1. Click the **Date range** filter.
2. Select the period of time for the export.
3. Click on the **Message Type** filter.
4. Select the return message types to include in the export.
5. Click **Export**.
The Export Filters window will display.
6. In the **Export** section, select **Applied filters**.
7. In the **Export as** section, select the file format in which you want to receive the report.
8. Enter the email address that the export will be sent to.
9. Click **Export**.\
After clicking **Export**, a pop-up will display saying that the export was successfully requested. Once the export is complete, you will receive an email with a link to download the file.
{% hint style="info" %}
Since personal data is deleted after 90 days, trackings that are older than 90 days will be included in the report but without any personal information. For more information, refer to the [Data Export](https://docs.parcellab.com/docs/platform/overview/data-exports) documentation.
{% endhint %}
---
# Agent Instructions: Querying This Documentation
If you need additional information that is not directly available in this page, you can query the documentation dynamically by asking a question.
Perform an HTTP GET request on the current page URL with the `ask` query parameter:
```
GET https://docs.parcellab.com/docs/retain/returns-customer-service.md?ask=
```
The question should be specific, self-contained, and written in natural language.
The response will contain a direct answer to the question and relevant excerpts and sources from the documentation.
Use this mechanism when the answer is not explicitly present in the current page, you need clarification or additional context, or you want to retrieve related documentation sections.