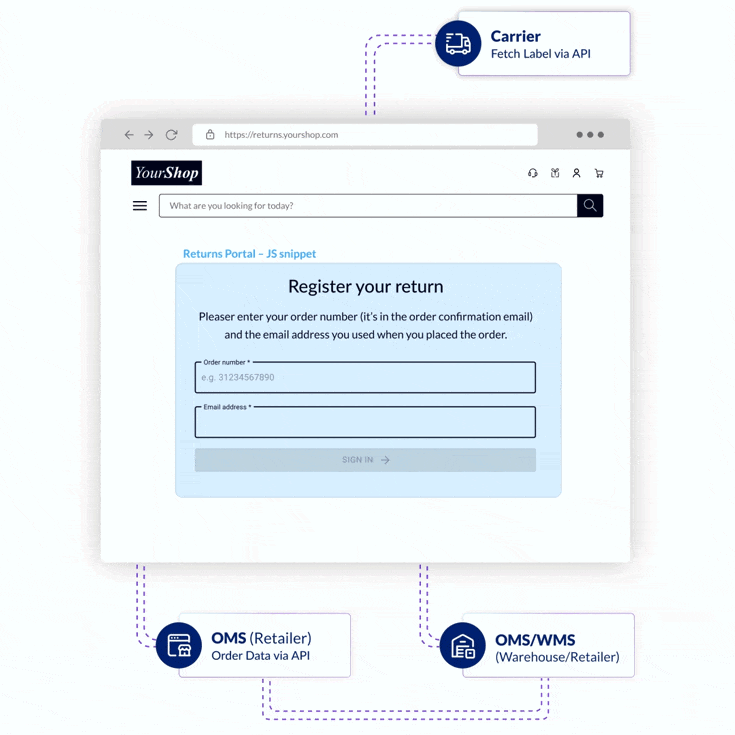
# Returns Portal

## Overview

The <code class="expression">space.vars.Product\_ReturnsPortal</code> provides a consistent and seamless end-to-end returns experience for your customers, while providing you with the flexibility and customization options needed to improve operations. It is a web interface that enables your customers to return purchased items, generate return labels, and schedule pick-ups.

It can be configured to include a real-time API order data connection that supports the processing of returns cases that go beyond the standard data retention policy of 90 days.
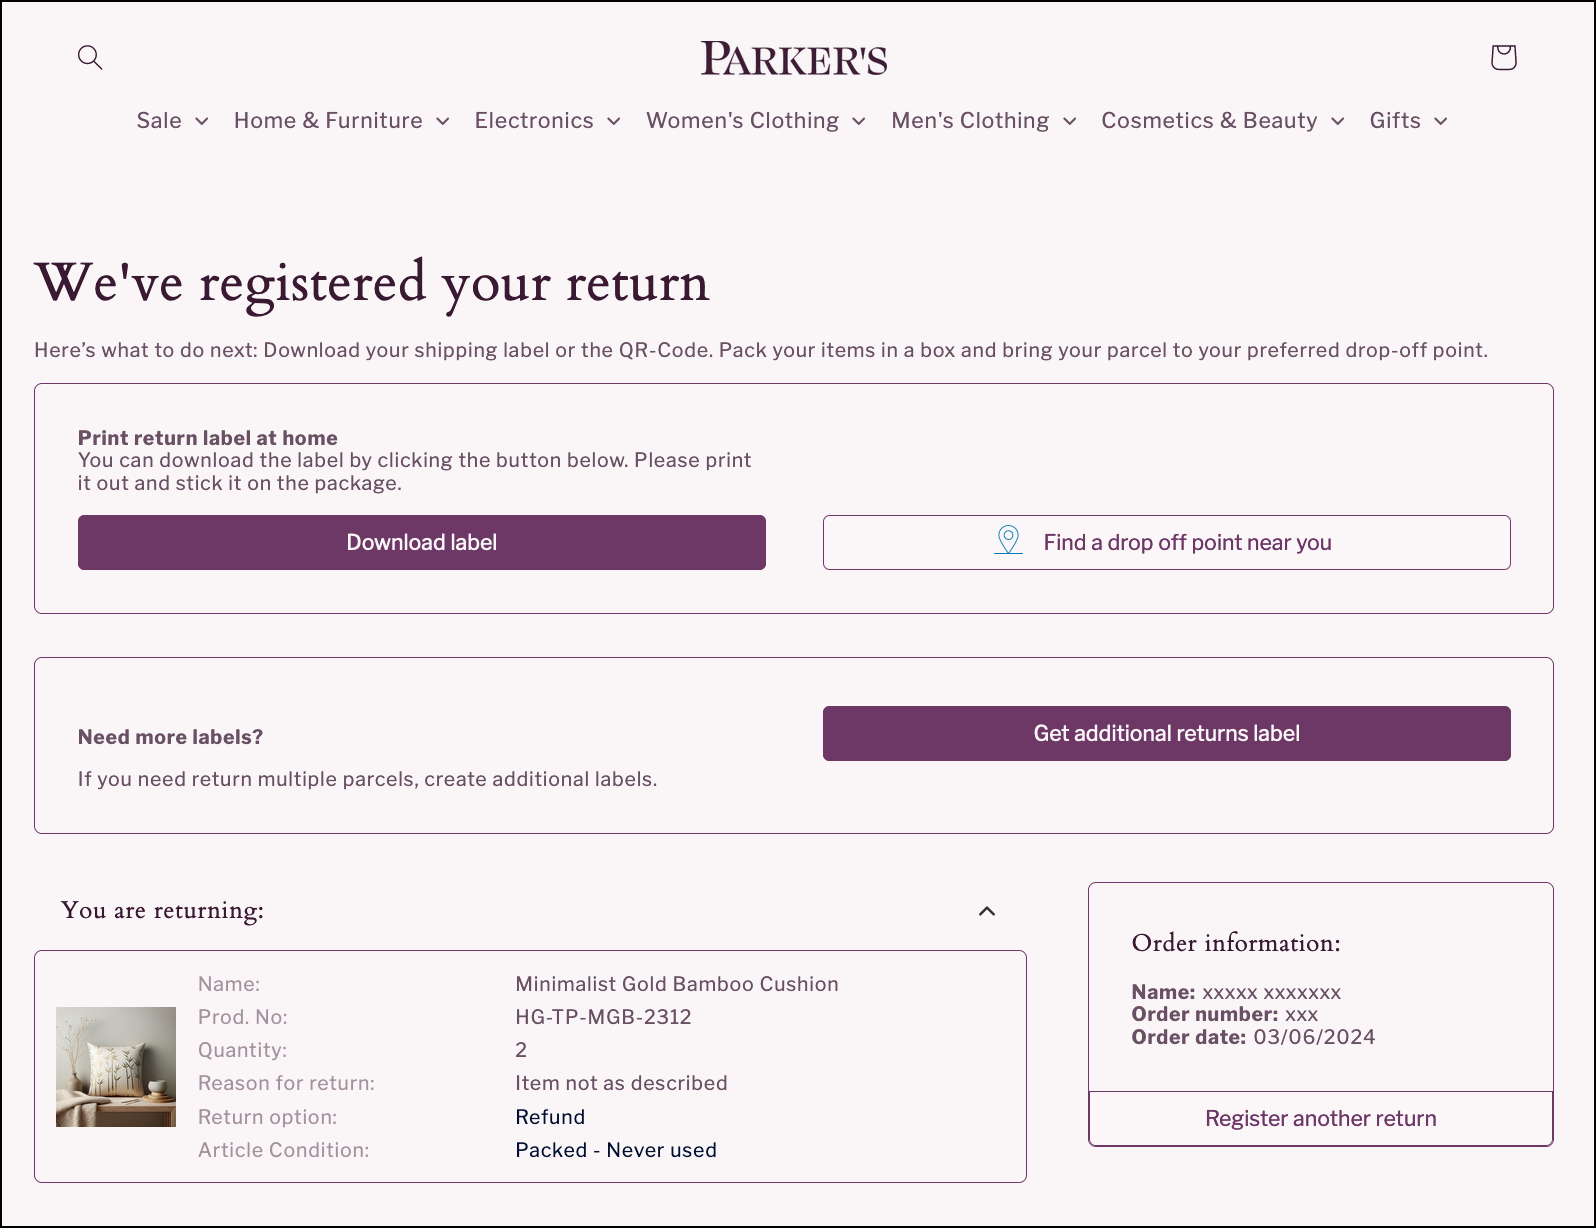
 &#x20;

The parcelLab <code class="expression">space.vars.Product\_ReturnsPortal</code> connects to your order management system (OMS) and the carriers you use. Using data from your OMS, the <code class="expression">space.vars.Product\_ReturnsPortal</code> displays each customer's order and allows them to select which items they want to return. After a return has been registered, the data can be fed back to the source system or sent to the processing warehouse.

<figure><img src="https://1156682959-files.gitbook.io/~/files/v0/b/gitbook-x-prod.appspot.com/o/spaces%2F-LPf1Lv1YUuLYva6LrXQ%2Fuploads%2FvU9phFRJjHSJLaIK6mru%2Fhow-pL-works-returns-2.gif?alt=media&#x26;token=6b517395-f937-4416-b3de-a393a8ef7cc4" alt=""><figcaption></figcaption></figure>

## Setting Up the Returns Portal Snippet

The following instructions explain the basics of setting up the Returns Portal snippet and how you can customize the data settings and style of the widget in three easy steps.

{% stepper %}
{% step %}

### Add the snippet to your website

Setting up parcelLab’s Returns Portal for your online shop is straightforward.

* Create an empty landing page, for example: at `/returns-portal`.
* Copy the Returns Portal snippet for Returns Portal v1 or v2 and paste it somewhere in the `<body />` (*not* the `<head />`) of your page where you want the Returns Portal to be displayed:
  * [Returns Portal v1 snippet](https://app.gitbook.com/s/m5MUhYrMmT0cei4QdxGn/returns/v1#add-the-snippet-to-your-website)
  * [Returns Portal v2 snippet](https://app.gitbook.com/s/ew6OnyRUe6InzC96WnMr/returns/v2#add-the-snippet-to-your-website)

This will automatically load our JS snippet and default CSS. The plugin will be rendered in the defined DOM node.&#x20;
{% endstep %}

{% step %}

### Modify the data settings

* Update the data settings for the Returns Portal v1 or v2 plugin and change any default settings where necessary:
  * [Returns Portal v1 data settings](https://app.gitbook.com/s/m5MUhYrMmT0cei4QdxGn/returns/v1#modify-the-data-settings)
  * [Returns Portal v2 data settings](https://app.gitbook.com/s/ew6OnyRUe6InzC96WnMr/returns/v2#modify-the-data-settings)
    {% endstep %}

{% step %}

### Styling and other configurations

* Edit the CSS styling (for Returns Portal v1) or configure advanced settings (for Returns Portal v2):
  * [Returns Portal v1 styling](https://app.gitbook.com/s/m5MUhYrMmT0cei4QdxGn/returns/v1#style-the-widget)
  * [Returns Portal v2 advanced configuration](https://app.gitbook.com/s/ew6OnyRUe6InzC96WnMr/returns/v2#advanced-configuration)
    {% endstep %}
    {% endstepper %}

{% hint style="info" %}
Alternatively, as an add-on to the base platform, we can host the Returns Portal for you. The widget will then be implemented on a page that can be styled according to your shop or brand’s design guidelines.

For further information please contact your parcelLab representative.
{% endhint %}

## **Base Platform for Returns**

The base platform for the <code class="expression">space.vars.Product\_ReturnsPortal</code> offers the following features:&#x20;

* Log in with the order number and additional information (for example: email address or zip code).
* Identify items to return and select return reasons.
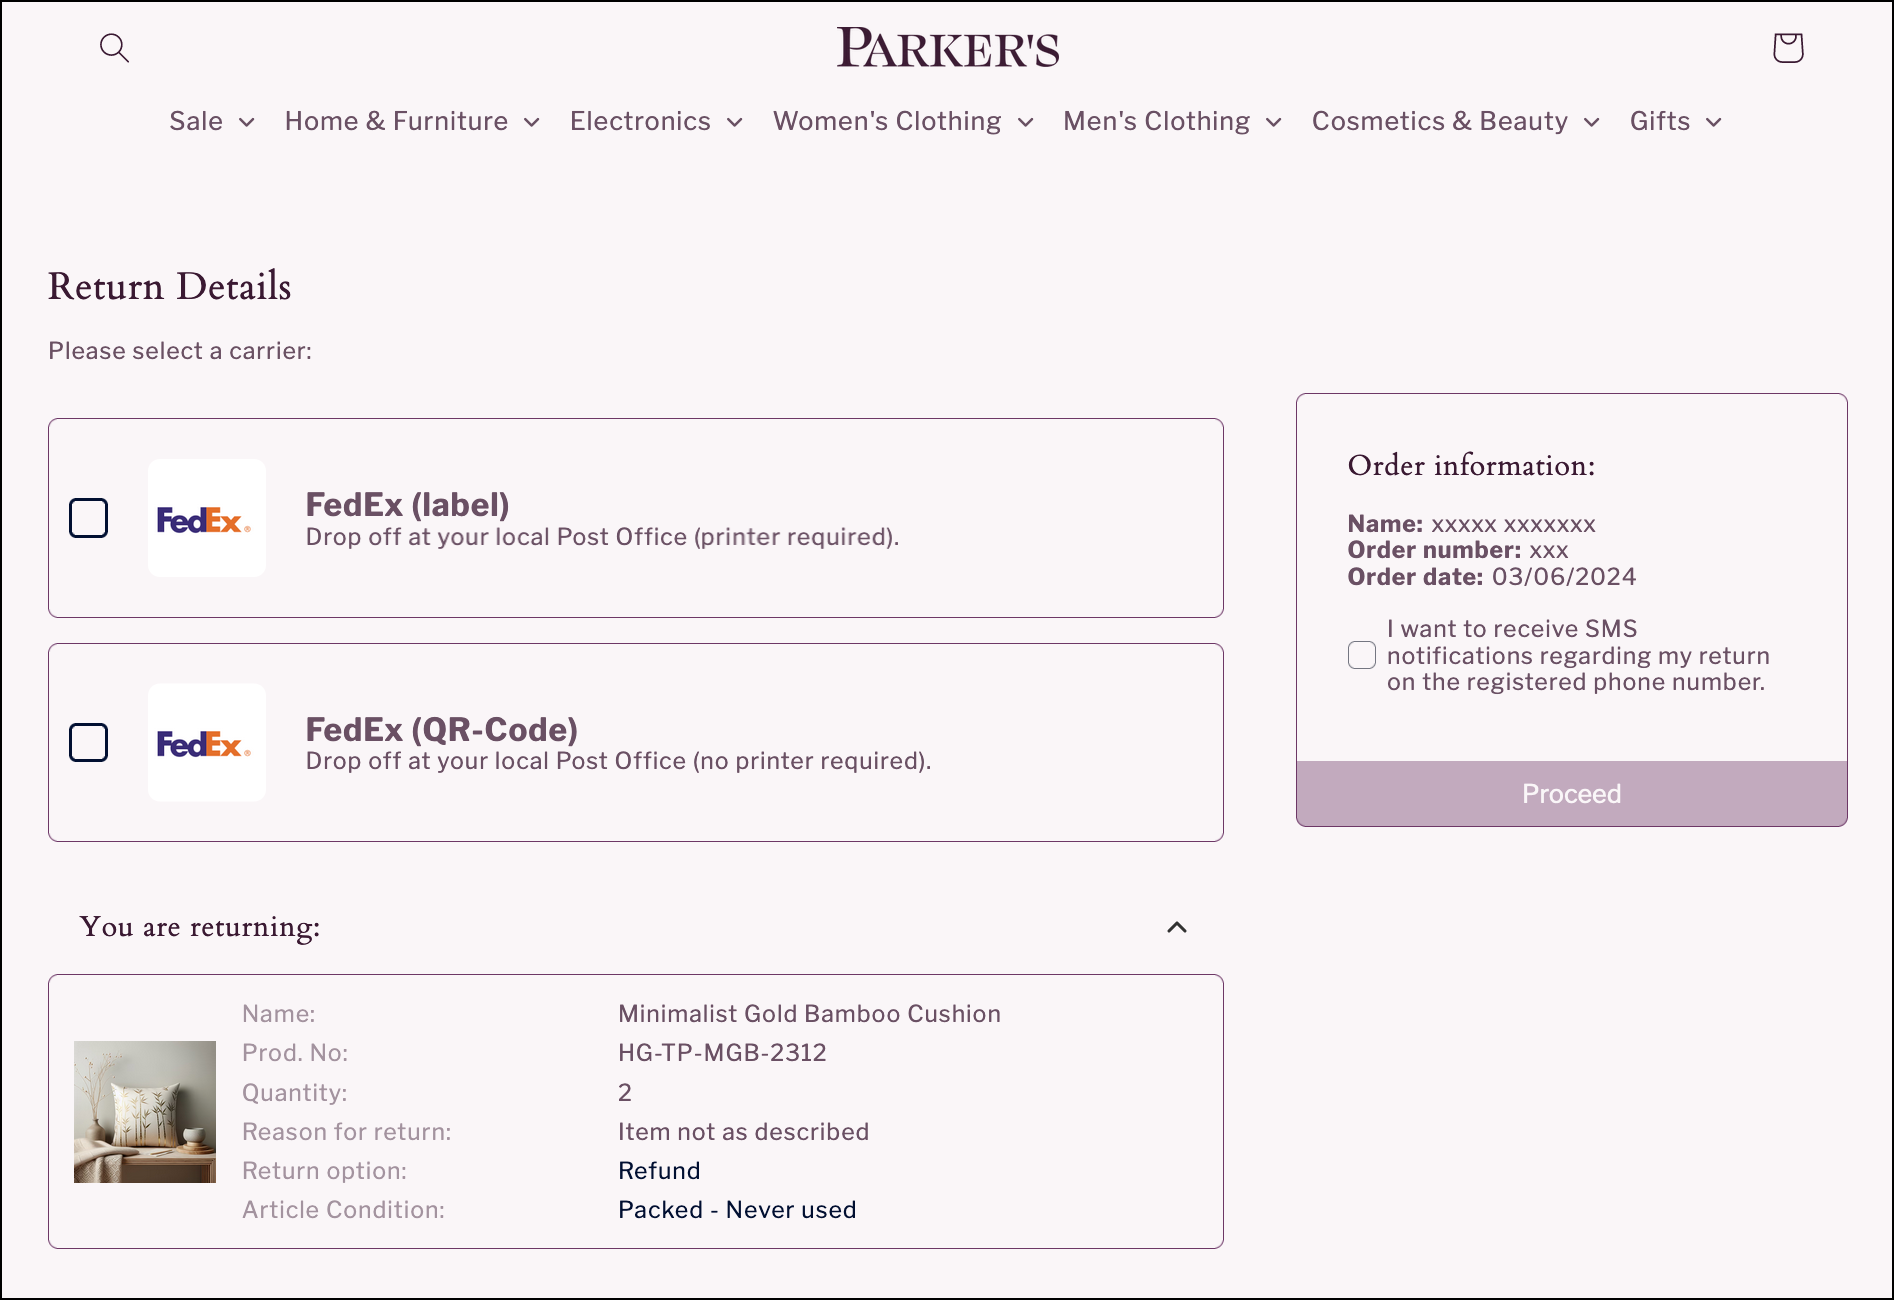
* Choose a specific carrier (if the option is available).
* Get carrier-specific confirmation and information to initiate the return.
* Get the same information via email.

### Returns User Journey Overview

This section describes the process of registering a return using parcelLab’s <code class="expression">space.vars.Product\_ReturnsPortal</code>.

{% hint style="info" %}
The following visual examples are for reference only.&#x20;

The <code class="expression">space.vars.Product\_ReturnsPortal</code> can be styled according to your brand requirements and the displayed components depend on which features are activated.
{% endhint %}

{% tabs %}
{% tab title="Login" %}
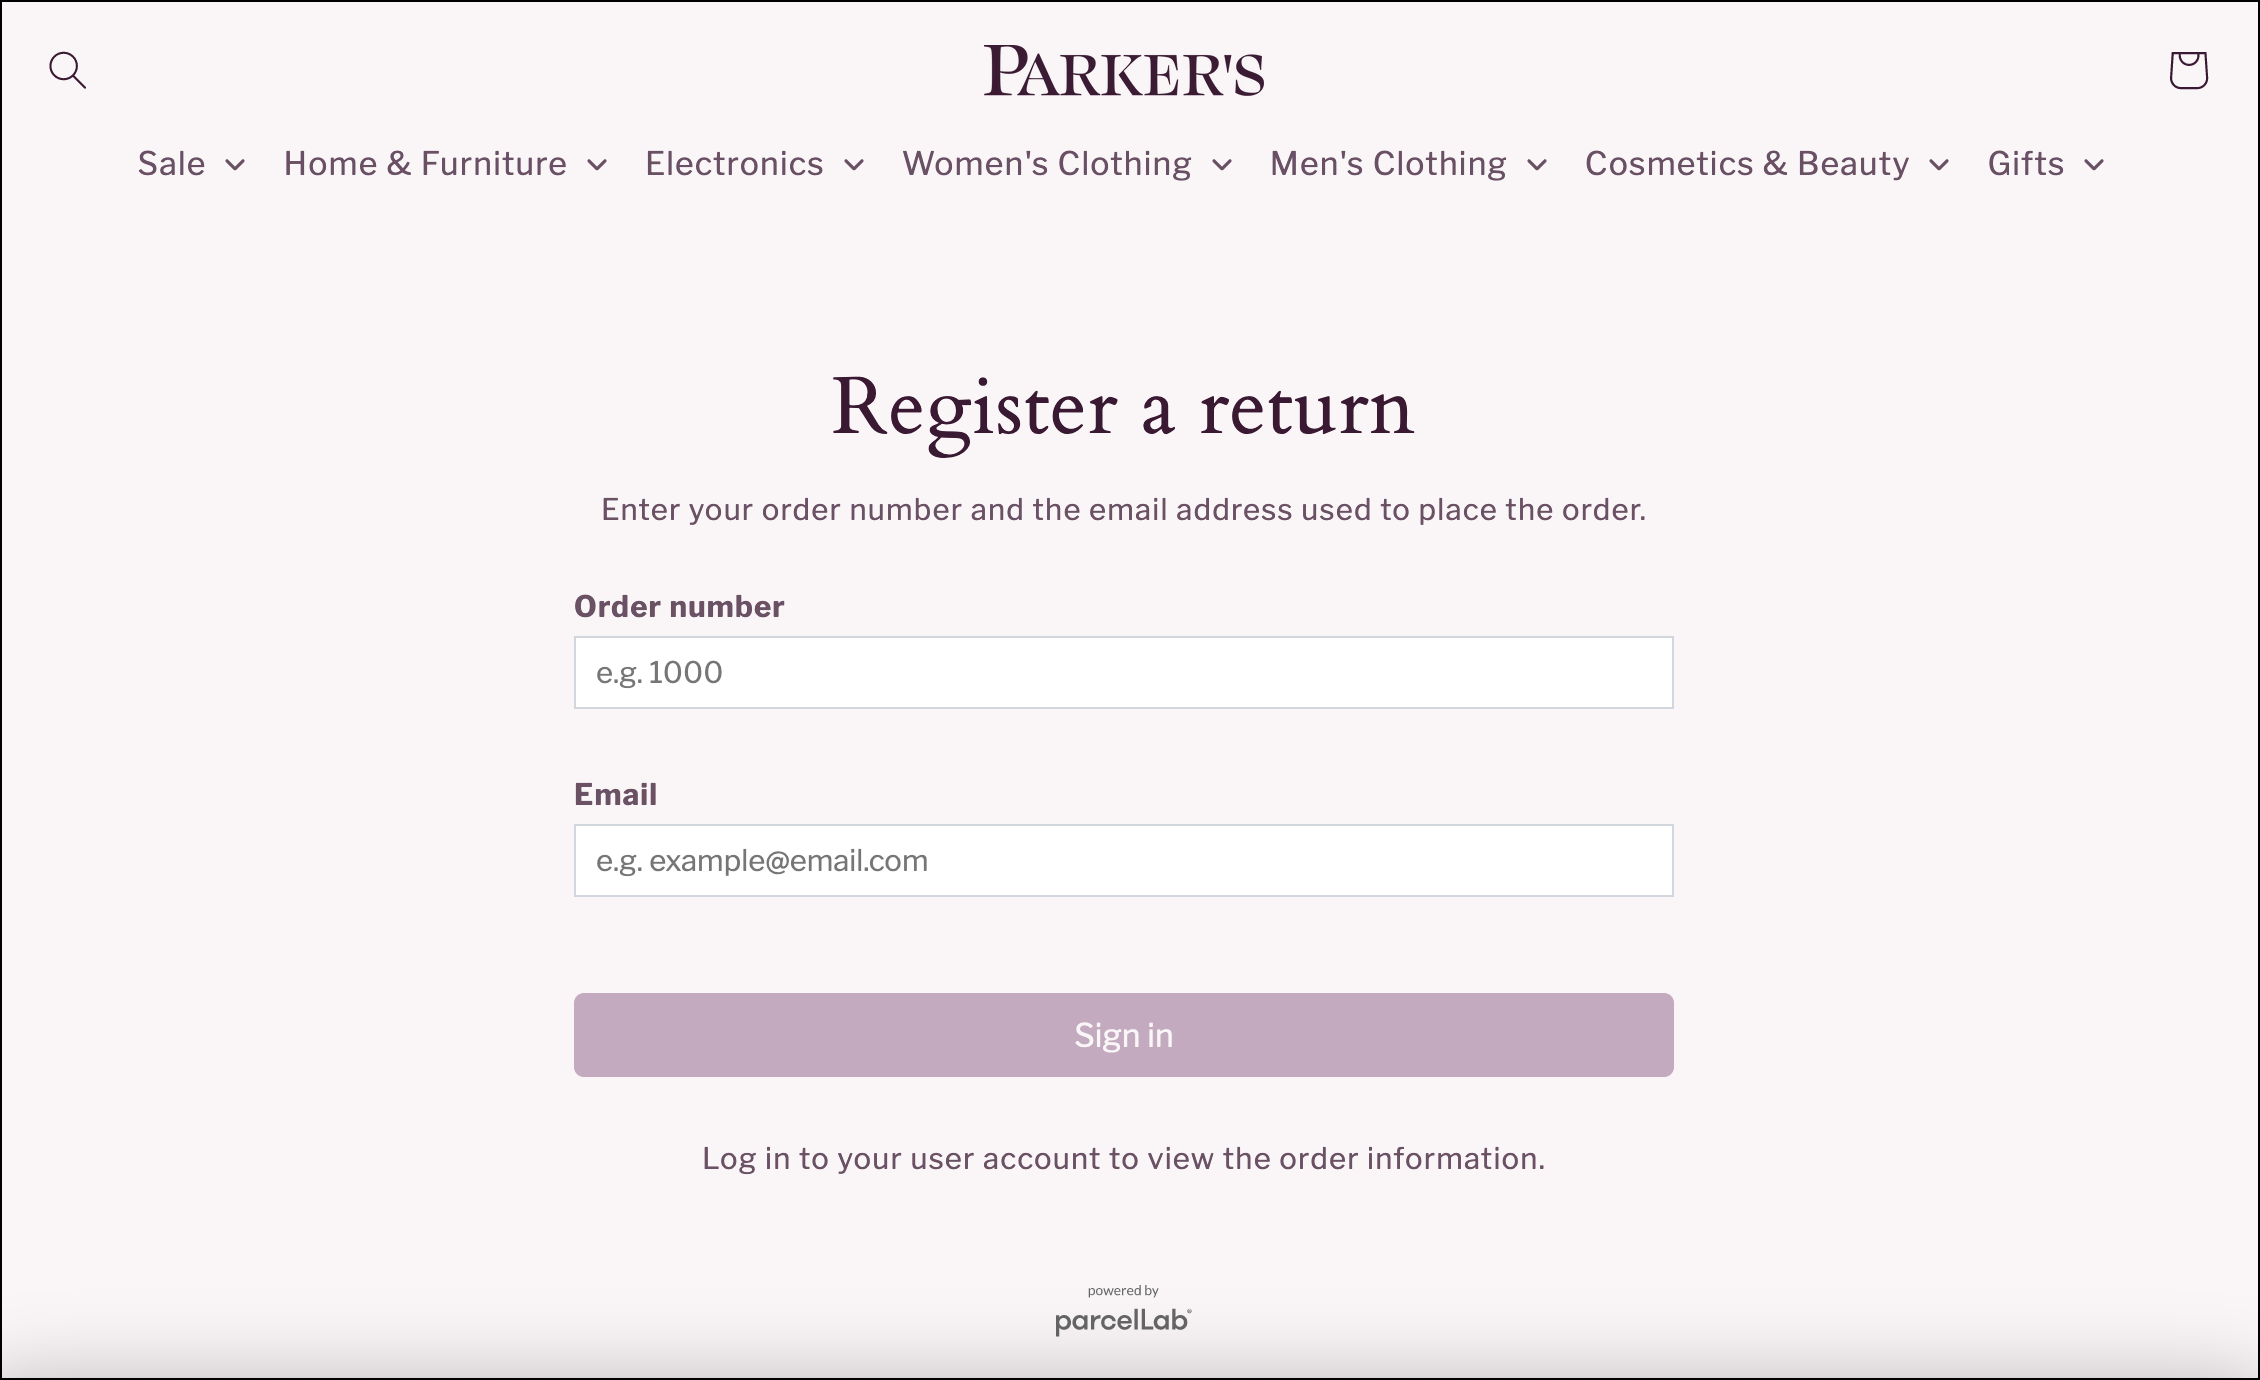
<figure><img src="https://1156682959-files.gitbook.io/~/files/v0/b/gitbook-x-prod.appspot.com/o/spaces%2F-LPf1Lv1YUuLYva6LrXQ%2Fuploads%2FMNoPdHvkAdLrzjXwF7P6%2FParkersRP_Login%20page.png?alt=media&#x26;token=9bbf6597-ec07-406b-98cd-62108a430e1a" alt="Returns Portal login form with an order number field and email field."><figcaption></figcaption></figure>

Users sign in with their order number and the email address used for the order.

#### <code class="expression">space.vars.Product\_ReturnsPortal</code> Direct Login

The <code class="expression">space.vars.Product\_ReturnsPortal</code> login page can be skipped by using a direct login URL that can be included in your email communication to customers. &#x20;

The URL for direct login has the following structure:
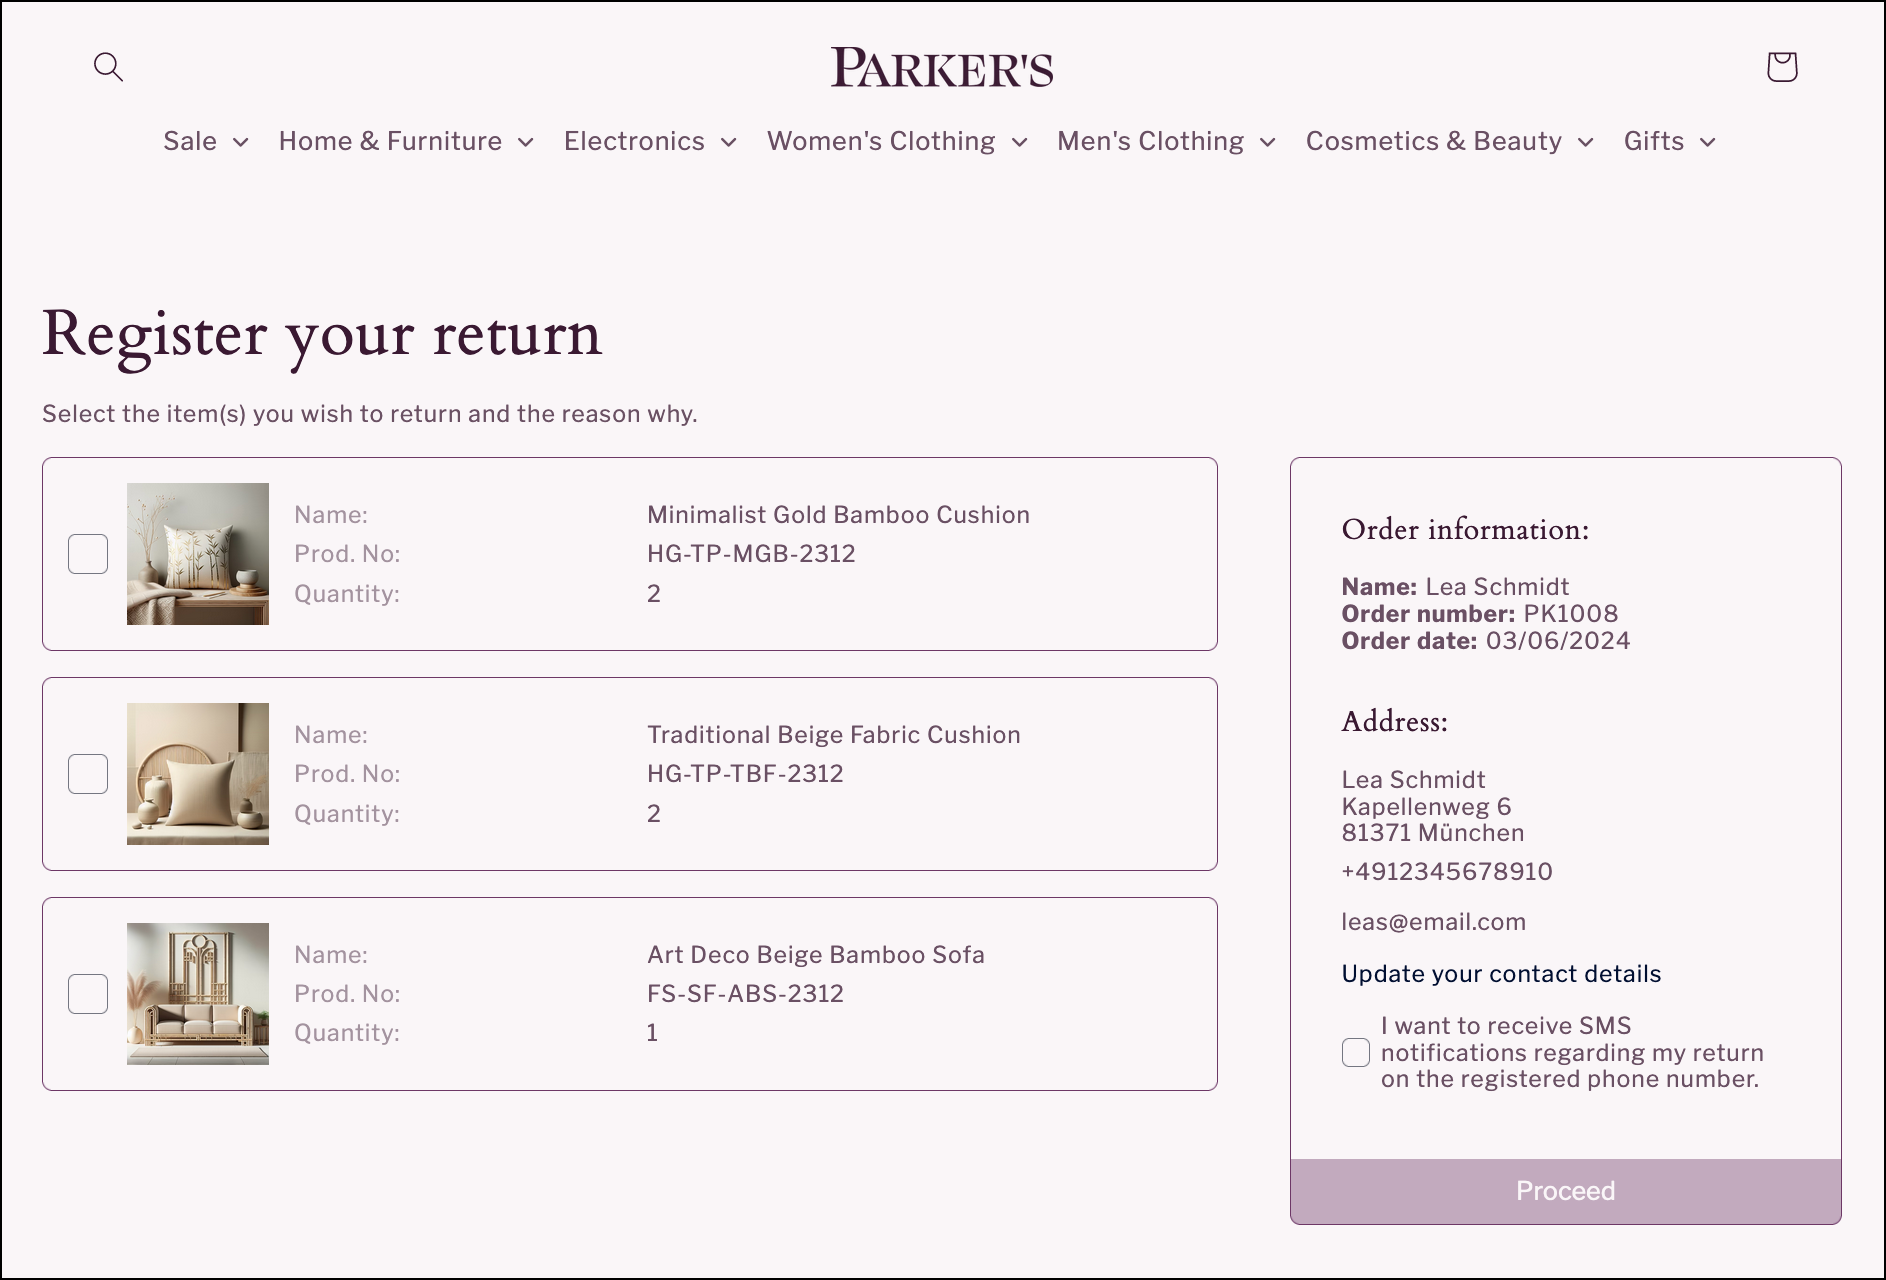
 <https://returns.parcellab.com/shopname/us/en/#/?ref=ordernumber&email=customeremailaddress>
{% endtab %}

{% tab title="Item Selection " %}

<figure><img src="https://1156682959-files.gitbook.io/~/files/v0/b/gitbook-x-prod.appspot.com/o/spaces%2F-LPf1Lv1YUuLYva6LrXQ%2Fuploads%2FPb7POT05Ohfju3FzDQAy%2FParkersRP_Item%20selection%20page.png?alt=media&#x26;token=69683156-d964-47f0-8fee-f435e2028997" alt="Item selection page with selectable list of items in the order and customer information including address and contact details."><figcaption></figcaption></figure>

On the item selection page, users can select items to return, the quantity, and reason for return applicable for each item.&#x20;

If the order consists of items that have already been returned, or items that are not eligible to be returned, this can be displayed below the list of items that are eligible for return. &#x20;

{% hint style="warning" %}
Return reason selection is mandatory. &#x20;
{% endhint %}
{% endtab %}

{% tab title="Carrier Selection " %}

<figure><img src="https://1156682959-files.gitbook.io/~/files/v0/b/gitbook-x-prod.appspot.com/o/spaces%2F-LPf1Lv1YUuLYva6LrXQ%2Fuploads%2F7licXPR5SRrfe2Htho8y%2FParkersRP_Carrier%20Selection%20Page.png?alt=media&#x26;token=ef51a33a-a77a-4a86-8c9f-ba2de3682b59" alt="Carrier selection page with a list of carrier options and a summary of items registered for return."><figcaption></figcaption></figure>

After users have selected the items to return, they can be directed to a carrier selection page.&#x20;

{% hint style="info" %}
This page is optional and can be skipped if you only have one carrier that can be used for returns.
{% endhint %}
{% endtab %}

{% tab title="Return Confirmation" %}

<figure><img src="https://1156682959-files.gitbook.io/~/files/v0/b/gitbook-x-prod.appspot.com/o/spaces%2F-LPf1Lv1YUuLYva6LrXQ%2Fuploads%2FLsQbDwiz2f4FKXp9LSsZ%2FParkersRP_Return%20confirmation%20page.png?alt=media&#x26;token=781276f4-bada-4c86-93cf-efecd0f21321" alt="Return confirmation page with downloadable label, drop-off location finder, and return summary."><figcaption></figcaption></figure>

On the confirmation page, users will receive confirmation that their return is registered. The information displayed can include return labels and QR codes, and a summary of the items that have been registered for return. &#x20;

The information available on the confirmation page is also sent to the user via email as confirmation of their return registration. &#x20;
{% endtab %}
{% endtabs %}

## Learn More

View the following topics for further details on integrating a returns portal and managing the returns process:

<table data-view="cards"><thead><tr><th></th><th></th><th data-hidden data-card-target data-type="content-ref"></th></tr></thead><tbody><tr><td><i class="fa-browser">:browser:</i> <strong>Add Returns Portal v1 Snippet</strong></td><td>Learn how to add the Returns Portal v1 to your website.</td><td><a href="https://app.gitbook.com/s/m5MUhYrMmT0cei4QdxGn/returns/v1">Returns Portal v1 Snippet</a></td></tr><tr><td><i class="fa-browser">:browser:</i> <strong>Add Returns Portal v2 Snippet</strong></td><td>Learn how to add the Returns Portal v2 to your website.</td><td><a href="https://app.gitbook.com/s/ew6OnyRUe6InzC96WnMr/returns/v2">Returns Portal v2 Snippet</a></td></tr><tr><td><i class="fa-link">:link:</i> <strong>Connect Order Data</strong></td><td>See how you can connect your order data for returns.</td><td><a href="https://app.gitbook.com/s/ew6OnyRUe6InzC96WnMr/returns/connect-order-data">Connect Order Data</a></td></tr><tr><td><i class="fa-file-arrow-down">:file-arrow-down:</i> <strong>Receive Data</strong></td><td>Find out more about our RMA export capabilities.</td><td><a href="https://app.gitbook.com/s/ew6OnyRUe6InzC96WnMr/returns/receive-order-data">Receive Order Data</a></td></tr><tr><td><i class="fa-star-shooting">:star-shooting:</i> <strong>Explore Returns Features</strong></td><td>See some of the features that can be configured for your returns portal.</td><td><a href="returns-portal/features">features</a></td></tr><tr><td><i class="fa-message-arrow-up-right">:message-arrow-up-right:</i> <strong>Set Up Returns Communications</strong></td><td>Learn more about the messages you can set up to provide return status updates.</td><td><a href="returns-communication">returns-communication</a></td></tr><tr><td><i class="fa-headset">:headset:</i> <strong>Manage Returns Orders</strong></td><td>Learn more about using the <code class="expression">space.vars.Product_App</code> for returns-related inquiries.</td><td><a href="returns-customer-service">returns-customer-service</a></td></tr><tr><td><i class="fa-circle-three-quarters-stroke">:circle-three-quarters-stroke:</i> <strong>Get Returns Insights</strong></td><td>View detailed statistics on your returns process.</td><td><a href="returns-insights">returns-insights</a></td></tr></tbody></table>

## FAQs

To help you get started with setting up your digital returns portal, see our FAQs below.

{% hint style="info" %}
If you have any further questions relating to setup of your returns portal, please contact your parcelLab representative.
{% endhint %}

<details>

<summary>How do I add the Returns Portal to my online store?</summary>

You can copy the JavaScript snippet below and paste it on an empty landing page (in the \<body /> *not* the \<head />) to integrate a shop frontend (or any webpage) with parcelLab.

For further information on configuring the Returns Portal plugin, see our [setup guide](https://docs.parcellab.com/docs/retain/broken-reference).

Returns Portal v1 snippet

{% code title="parcellab-returns-portal-snippet.htm" overflow="wrap" %}

```html
<div id="pl-returns-plugin"
  data-user="{{your parcellab user id here}}"
  data-lang-code="{{lang code of your current shop site e.g. de}}"
  data-country-code="{{country code of your current shop site e.g. ch}}"
  data-scroll="off">
</div>
<script src="//returns.parcellab.com/dist/returns-plugin.js" async="true"></script>
<script>(function () {/* Load default styles ... */if(!document.getElementById("pl-returns-portal-styles")){var styles=document.createElement("link");styles.id="pl-returns-portal-styles";styles.rel="stylesheet";styles.href="//returns.parcellab.com/dist/returns-plugin.css";document.getElementsByTagName("head")[0].appendChild(styles)}})();</script>
```

{% endcode %}

Returns Portal v2 snippet

```html
<pl-returns-portal
  code="your-portal-code"
  account-name="parcellab-account-name"
>
</pl-returns-portal>

<script
  type="module"
  src="https://returns-app.parcellab.com/static/plugin/js/loader.mjs"
>
</script>
```

</details>

<details>

<summary>How can I send order data to parcelLab for my Returns Portal to work?</summary>

You can provide the required order data for the Returns Portal in one of the following two ways:

1. Using your outbound order data.\
   We reference a database that contains order data sent to us via file or API connection for outbound trackings.
2. Using real-time API connection.\
   You provide an API endpoint that we will call for order data the moment a customer logs in to your Returns Portal.

For more information on order data requirements for the Returns Portal, see our [Returns Portal documentation](https://app.gitbook.com/s/m5MUhYrMmT0cei4QdxGn/returns/connect-order-data).

</details>

<details>

<summary>Do you provide RMA exports?</summary>

Yes, we can provide an RMA export of returns data to your warehouse management system via file, webhook, or API.

For more information on RMA exports, see our [Returns Portal documentation.](https://app.gitbook.com/s/m5MUhYrMmT0cei4QdxGn/returns/receive-data)

</details>

<details>

<summary>What compensation methods can I configure for my Returns Portal?</summary>

The two main options available are refund and exchange. Additional refund options such as store credit or Shopify gift card can be configured as well.

For further information on configuring compensation methods, see our [Returns Portal documentation](https://docs.parcellab.com/docs/retain/returns-portal/features/compensation-methods).

</details>

<details>

<summary>Can my customers download more than one return label?</summary>

For situations where products may need to be returned in multiple boxes, you can enable your customers to download additional labels. Each additional label will be treated as a new return tracking to enable tracking and communication for the additional return parcels.

For more information on generating additional return labels, see our [Returns Portal documentation](https://docs.parcellab.com/docs/retain/returns-portal/features/request-multiple-labels).

</details>
