
Order Status Page Configuration
Configure a fully embedded Order Status page in your shop with all the relevant delivery status information and customizable content to promote your brand.
Quick Install
To insert the JavaScript snippet onto a page on your website or online shop:
Create an empty landing page (for example: at /track-and-trace).
Copy the following snippet and paste it somewhere in the <body /> (not the <head />) of your page where you want the order status to be displayed.
You will need to insert your parcelLab account ID in the plUserId field when copying the tracking snippet below.
This will automatically load our JavaScript snippet and default CSS. The plugin will be rendered in the defined DOM node.
<div id="parcellab-track-and-trace">
<img src="https://cdn.parcellab.com/img/loading-spinner-1.gif" alt="loading" />
</div>

<script>
  function plTrackAndTraceStart() {
        window.parcelLabTrackAndTrace.initialize({
          plUserId: TYPE_YOUR_USER_ID_HERE,
          lang: 'en', // default language if not specified for order
          show_searchForm: true,
          show_zipCodeInput: true,
          show_articleList: true,
          use_campaign_banners: true
        });
        var linkTag = document.createElement('link');
        linkTag.rel = 'stylesheet';
        linkTag.href = 'https://cdn.parcellab.com/css/v5/main.min.css';
        document.getElementsByTagName('head')[0].appendChild(linkTag);
  }
</script>
<script async onload="plTrackAndTraceStart()"
src="https://cdn.parcellab.com/js/v5/main.min.js"></script>Additional Options
You can configure the plugin adding the options to the snippet above. The following code example includes all possible additions.
onRendered Hook
You can use the onRendered option to alter the DOM programmatically after the plugin has rendered its content. This will overwrite any CSS styling that has been applied to the targeted elements.
As the plugin was created in React, modifying, adding children to, or removing children from its elements may lead to inconsistent visual results or crashes. It is advisable to proceed with caution.
If you want to modify or replace elements, it is recommended that their styles are updated so they do not display visually (that is: display: none) in order to make room for your new element or copy of an existing element that gets appended to the page instead.
Your onRendered function may also expect to receive an object with data about the Order Status page, such as:
Article list information (if available)
Checkpoints information
Which parcel is displayed as the active tracking (for multi-parcel orders)
Function to select the active tracking to be displayed, that can be called programmatically
Options applied to customize and configure the plugin during its initialization
Custom Translations
You can change the static plugin text parts with your own translations by adding the customTranslations attribute to your options, and then inserting your custom text. If you do not define a language in your customTranslations, the plugin will revert to the original text when rendering in this language.
Alternative: Hosted Version
The tracking website can be reached at either versand-status.de, paket-fuer-mich.de or delivery-status.com. The URL scheme is identical to the API endpoint as seen in the following example.
Using the Tracking Plugin
After the page has been prepared as described in the previous section, it is ready for use. The plugin supports tracking for single parcels, and consolidated tracking for whole orders.
The tracking plugin does not use any cookies, local storage, fingerprint or anything that would require a cookie consent banner.
Usage with Parcels
The plugin expects two parameters to be set in the URL: the courier and trackingNo. If these are set and valid, it will render an action box on the left-hand side of the page displaying the currently most relevant information and a complete history on the right-hand side of the page.
A list of possible carrier codes can be found in our documentation, although is not required as the URL to this page will be automatically generated by parcelLab.
Carrier InterfacesUsage with Orders
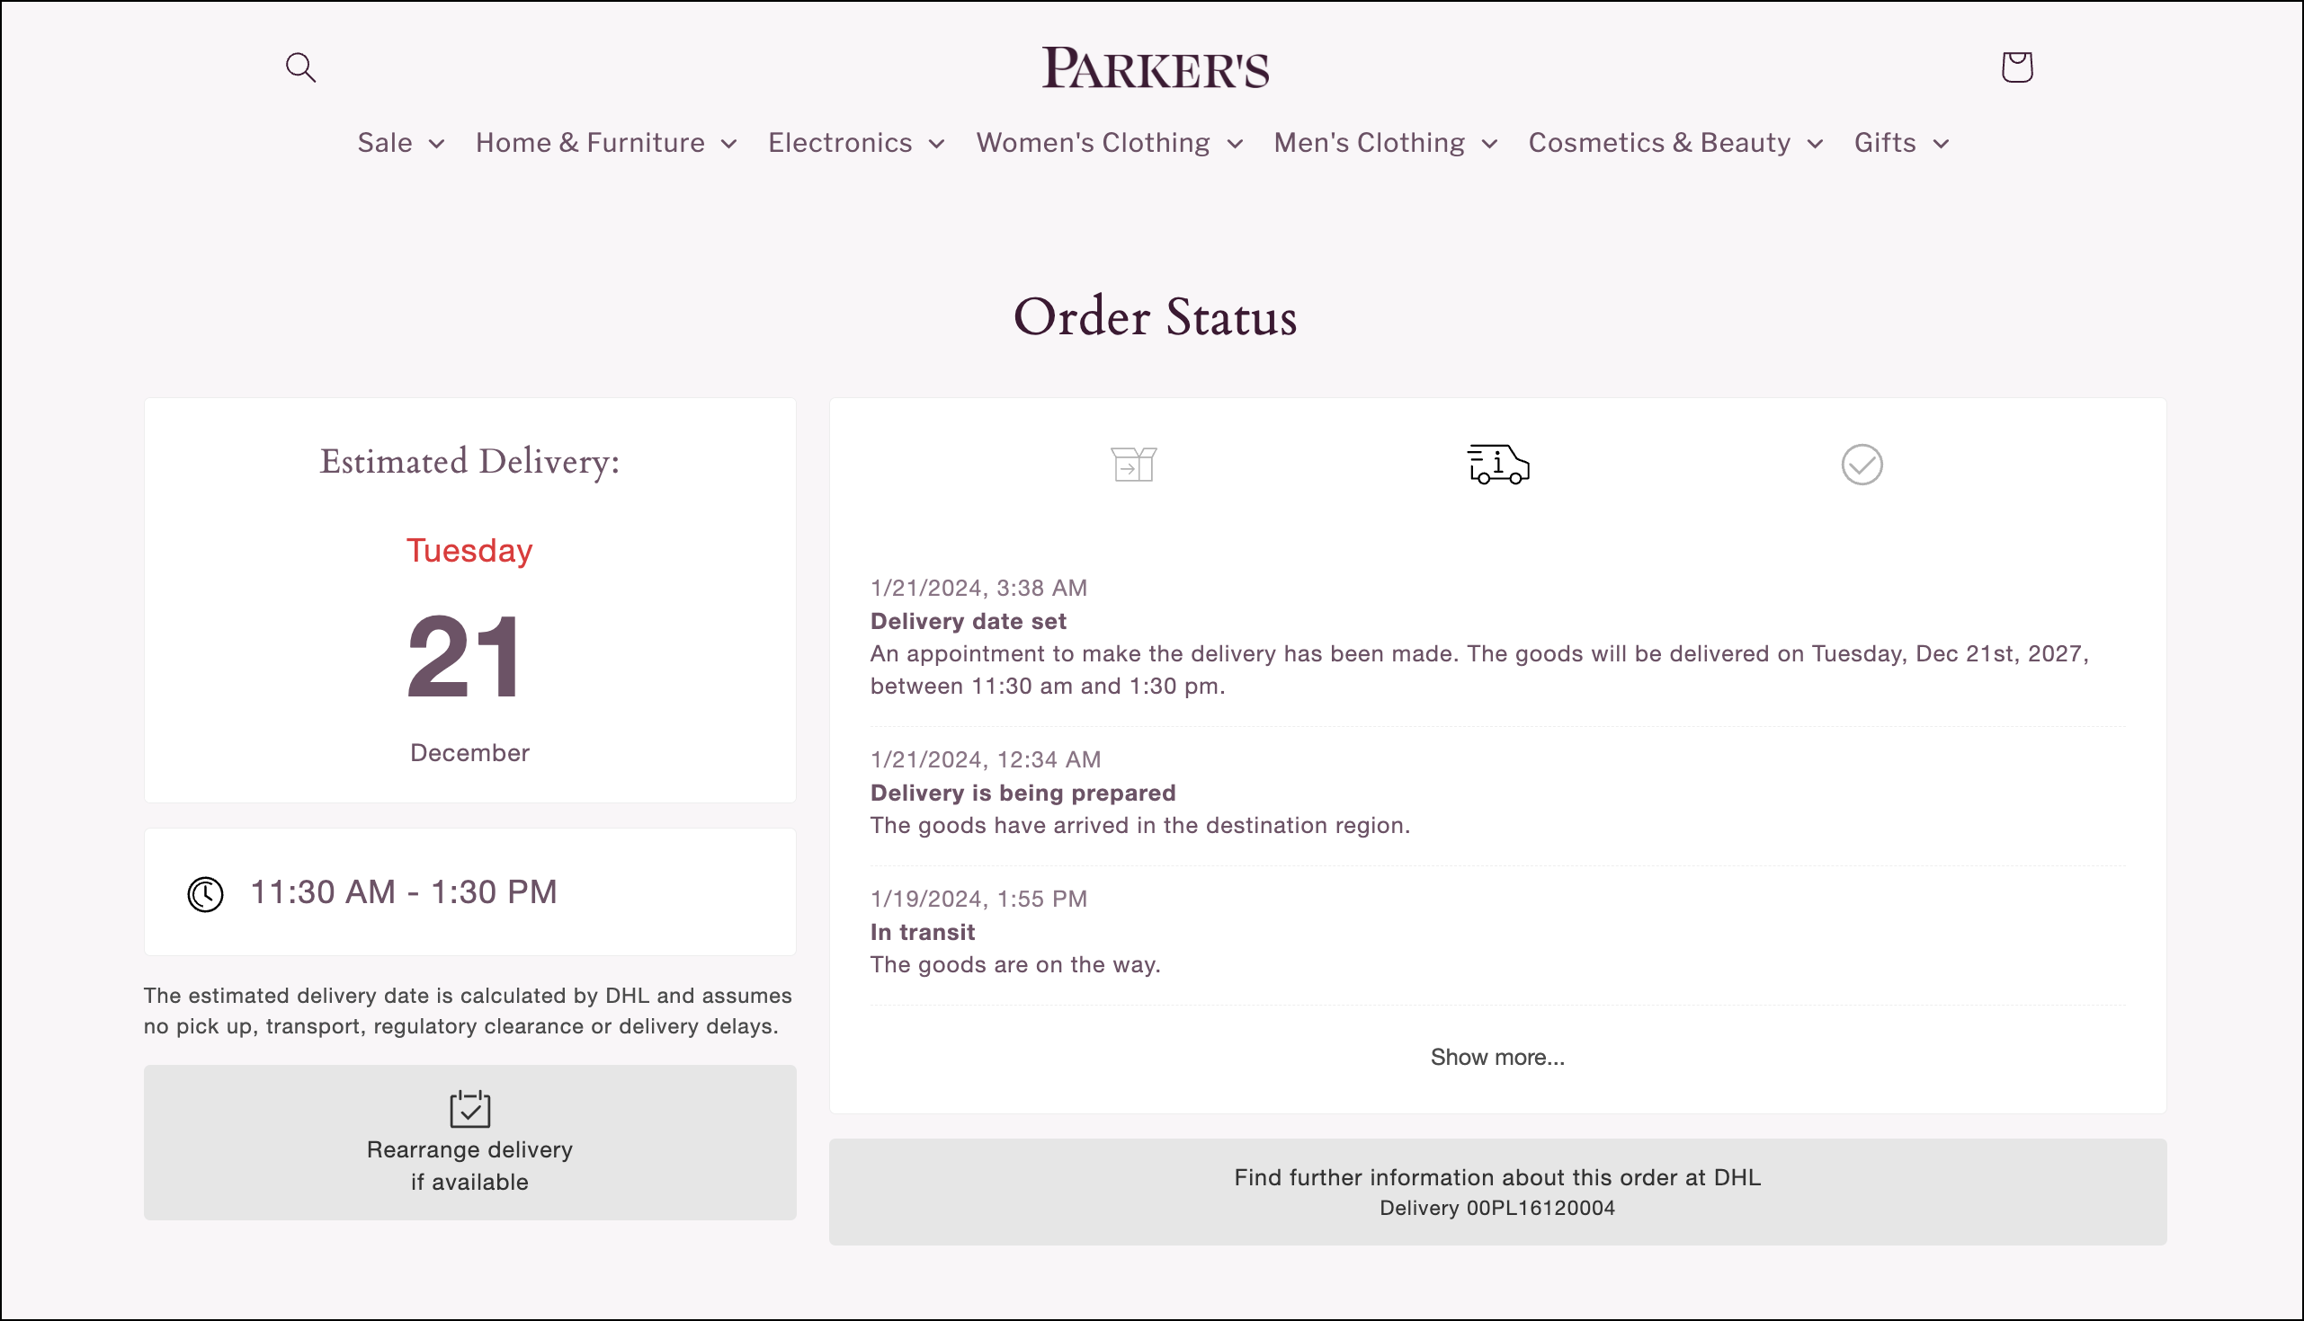
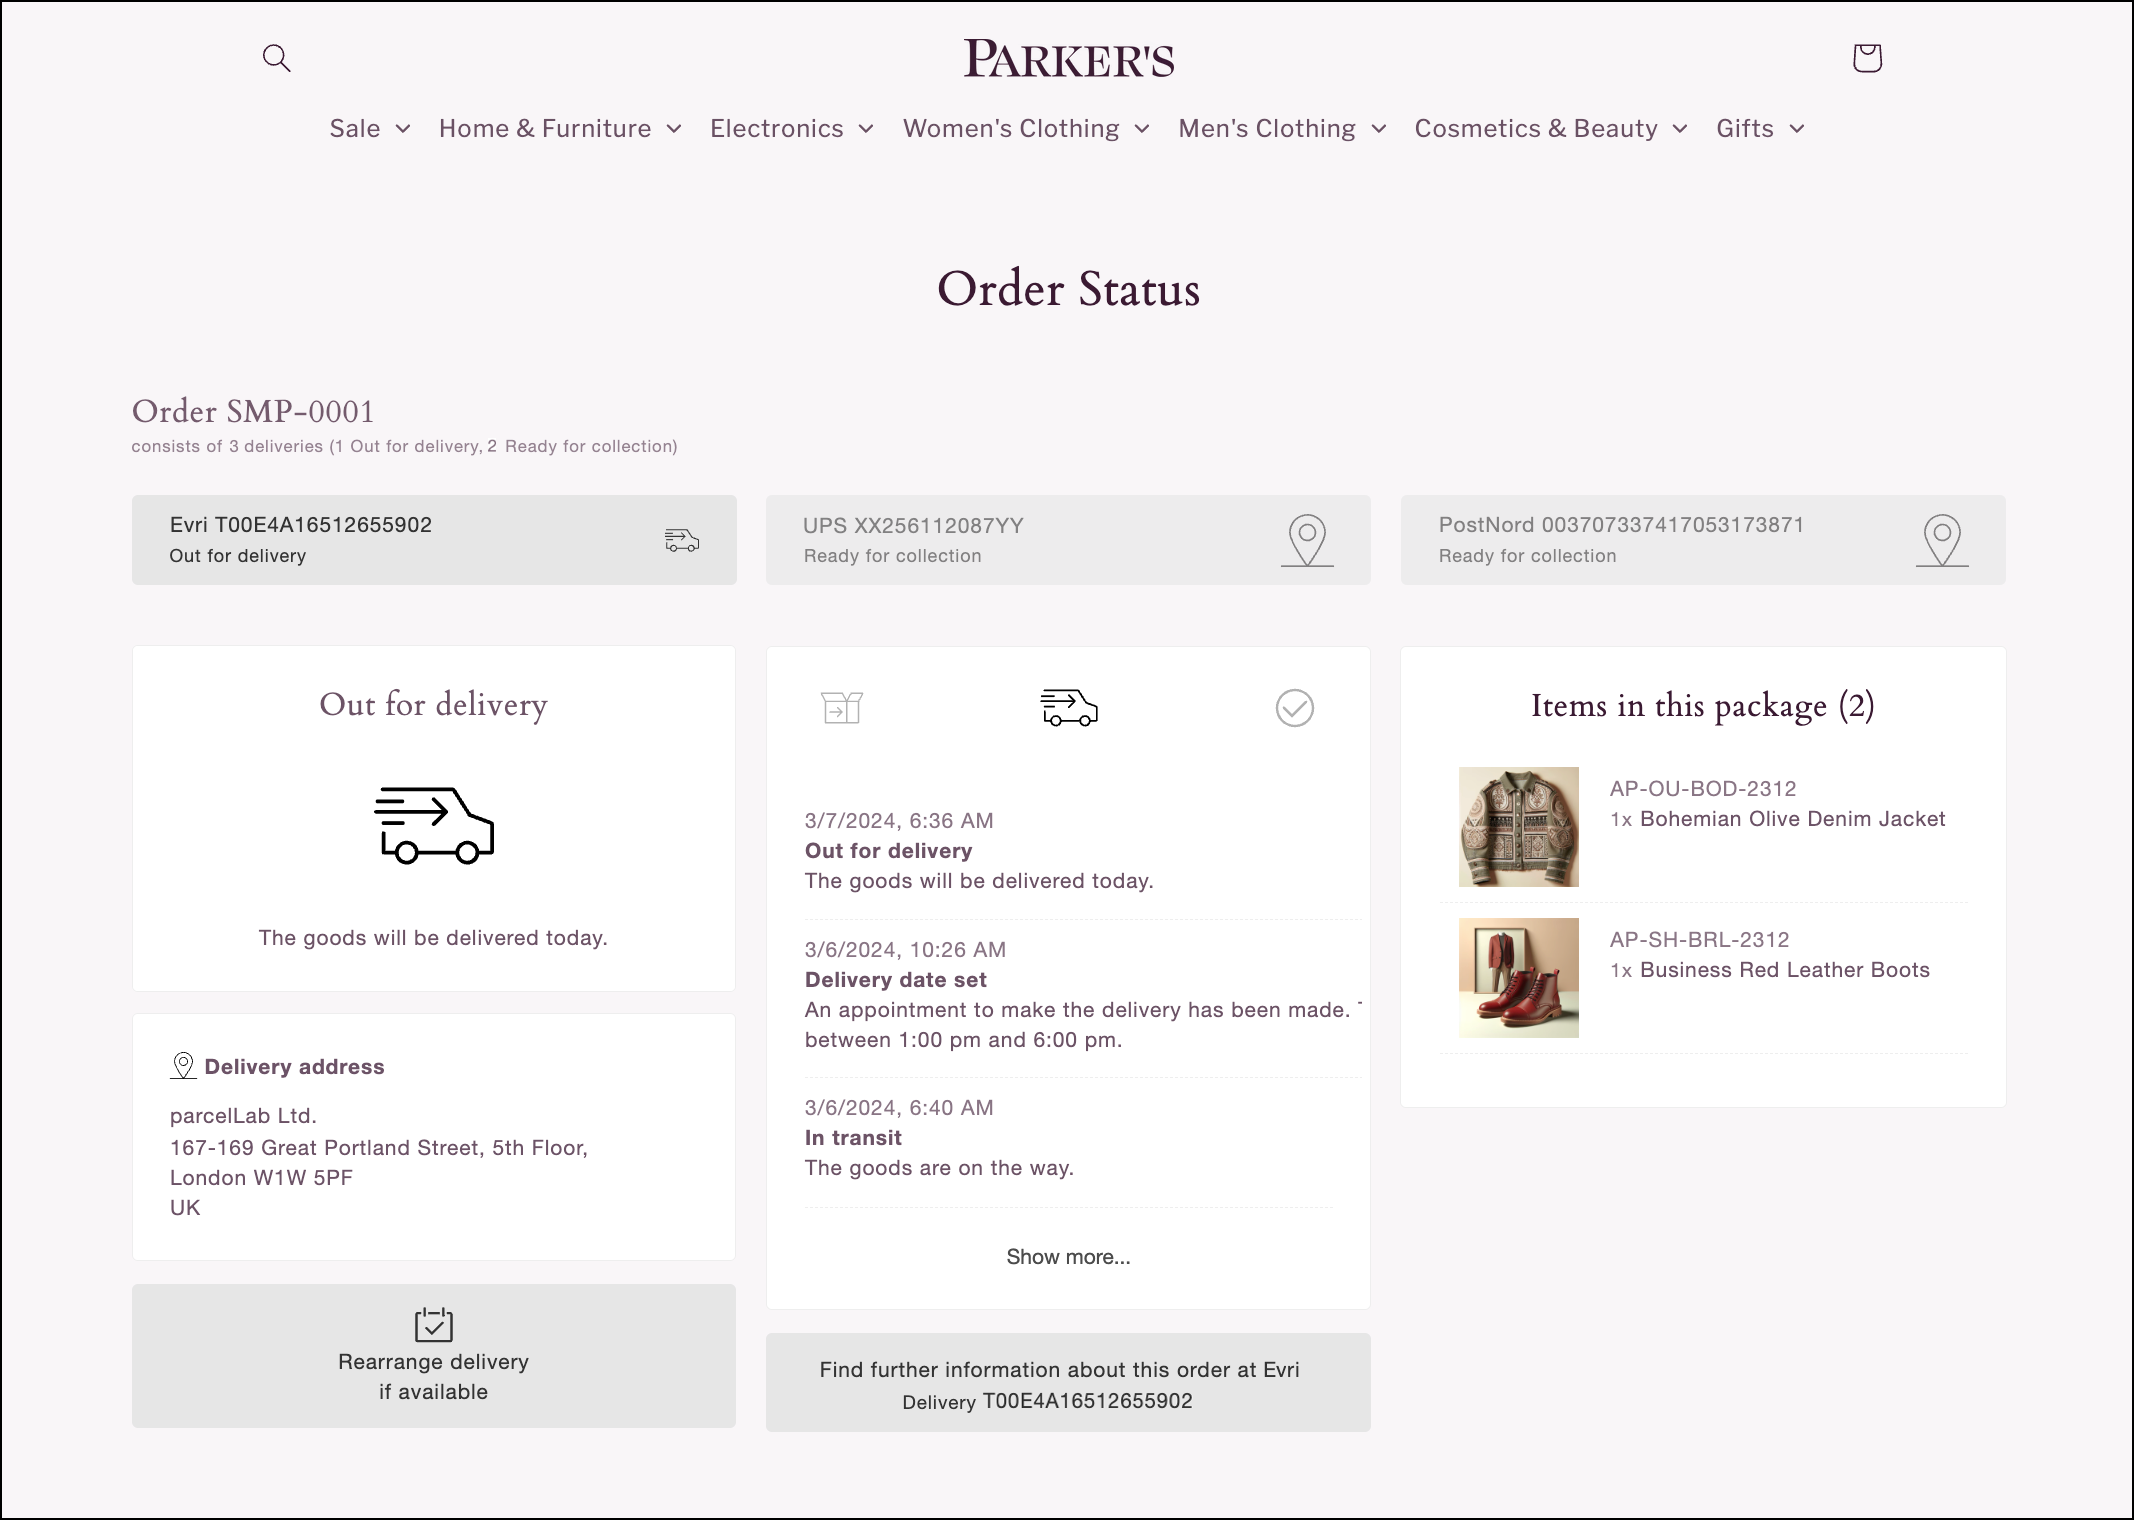
The more advanced use of the plugin is for orders. This will render all parcels of an order, generate an overview, and list all individual parcels.
You can hide cancelled parcels in an order from displaying on the Order Status page by using the hide_cancelled option in the URL or JavaScript object (for example: https://myshop.com/tracking-and-trace?plUserId=1612197&orderNo=00PL004&hide_cancelled=yes).
We recommend setting the plUserId directly in the options rather than through the URL (see below on how to do that).
If you are running several shops with overlapping ranges of order numbers in your account, you can also set the client to limit trackings to a specific shop in the parcelLab system.
plUserId
Your user ID in the parcelLab system.
1612197
client
The parcelLab-internal shop ID associated with a specific shop.
parcelfashion-US
Testing
You can test the implementation and display of the order status by using our sample parcels. Append the following queries to the URL of the page where you installed our plugin.
Typical Use Cases
You can define options by passing an object as the second argument when creating a new parcelLab object. The use cases below list some of the possible options.
All options below can also be set through the URL.
Define the Language
The tracking plugin uses the browser/system language by default.
You can change the default language to display on the Order Status page using the lang option.
You can choose one of these methods to do it:
In the URL query parameters via
&lang=esIn the JavaScript object when loading via
lang: 'es'
When a language is written right-to-left (RTL), such as Arabic, the HTML page hosting the plugin must use <html lang="ar" dir="rtl"> in order for the browser to render the translated text correctly.
Supported Languages
The languages listed below are supported on the Order Status page. Use the corresponding values when changing the default language via the URL query parameter or the Javascript object.
English:
enGerman:
deSpanish:
esFrench:
frItalian:
itDutch:
nlDanish:
daSwedish:
svNorwegian:
noFinnish:
fiPortuguese:
ptPolish:
plRomanian:
roCzech:
csSlovak:
skSlovenian:
slBulgarian:
bgHungarian:
huGreek:
elGalician:
glBasque:
euKorean:
koJapanese:
jaRussian:
ruTurkish:
trCatalan:
caChinese (simplified):
zhChinese (traditional):
zh-HantCroatian:
hrEstonian:
etLatvian:
lvLithuanian:
ltSerbian:
srArabic:
ar(the HTML page hosting the plugin must use<html lang="ar" dir="rtl">)Vietnamese:
vi
If you require support for a language that is not listed, please contact your parcelLab representative.
Delivery Options
Delivery or reroute options give the recipient the choice to change how, where, and when they want to receive their parcel. This information can be provided via a link to the carrier's website by including the rerouteButton option. This link is displayed on the left-hand side of the Order Status page by default whenever delivery options are available.
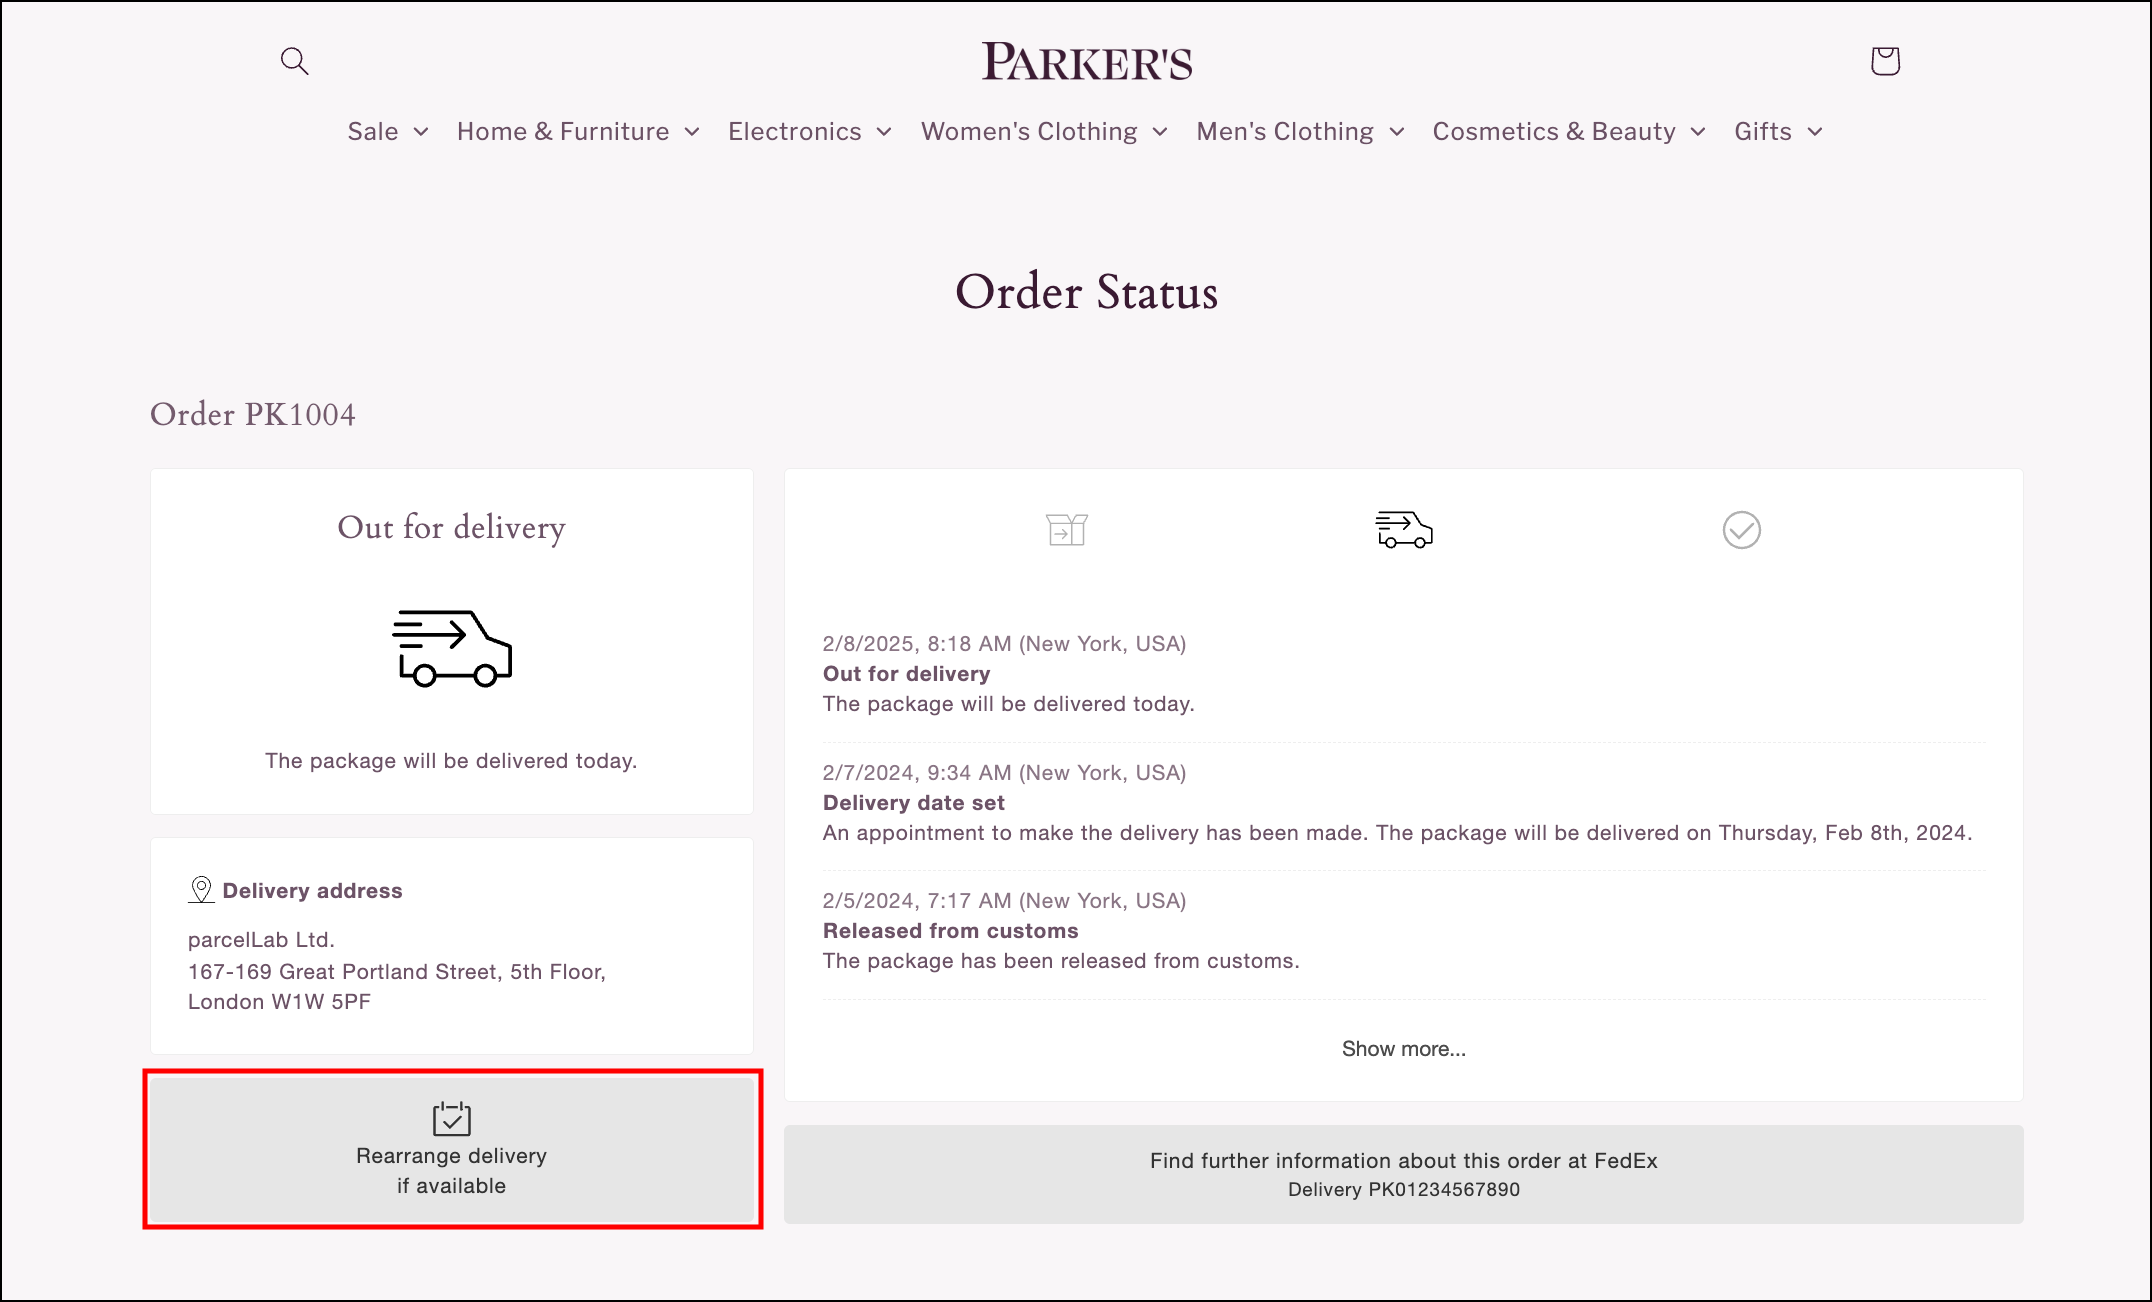
You can change the default position of the reroute link to display on the right-hand side of the Order Status page using the rerouteButton option.
You can choose one of these methods to do it:
In the URL query parameters via
&rerouteButton=rightIn the JavaScript object when loading via
rerouteButton: 'right'
Carrier Information
The Order Status page can display tracking information for inter-country deliveries based on the origin carrier or the destination carrier. By default, the Order Status page displays the name of the destination carrier and the delivery status updates from the destination carrier.
However, before the parcel is handed over, you can choose to display information from the origin carrier. This can provide your customers with further information about the parcel in transit before it has arrived in the destination country.
You can display the origin carrier on the Order Status page using the use_origin_courier option.
You can choose one of these methods to do it:
In the URL query parameters via
&use_origin_courier=trueIn the JavaScript object when loading via
use_origin_courier: true
The Order Status page displays the tracking details of either the origin carrier or the destination carrier. If the use_origin_courier option is used, your Order Status page will not display tracking information from the destination carrier.
Order Search Form
A search form can be used on the Order Status page if the tracking was not found, or no tracking number/order number was given.
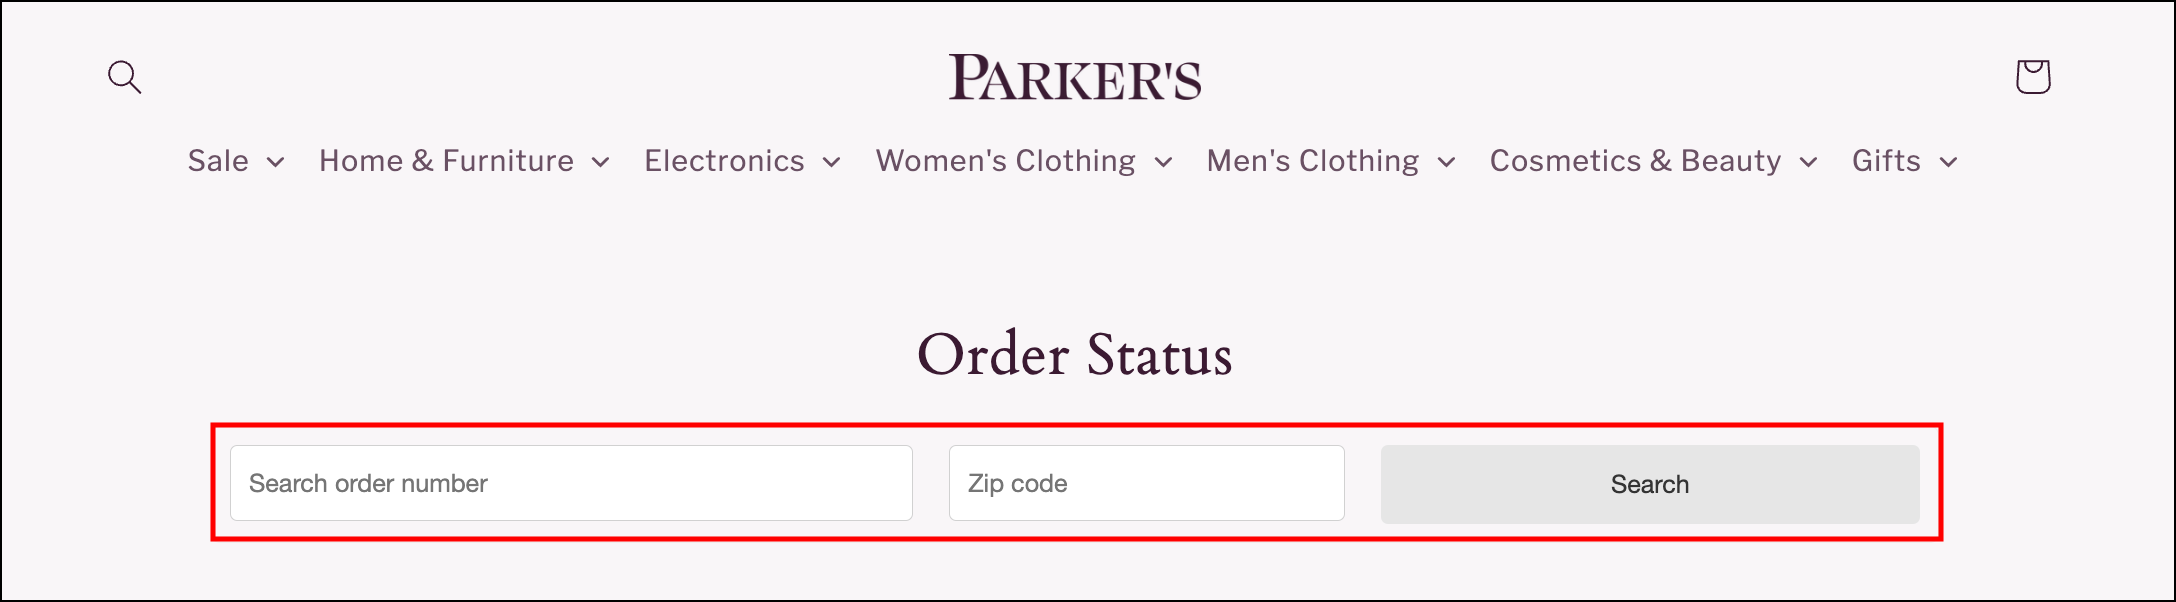
The show_searchForm and show_zipCodeInput options can be set directly in the options when initializing the plugin to keep the URL clean.
Authentication for Displaying Personal Information
You can prompt customers for authentication to display personally identifiable information on the Order Status page (that is: their name and delivery address). This can be done by using the forceZip option to display a form that prompts customers for authentication using their zip code before personal information is displayed.
You can enable zip code authentication using the forceZip option.
You can choose one of these methods to do it:
In the URL query parameters via
&forceZip=trueIn the JavaScript object when loading via
forceZip: true
If the URL for an order already contains a security hash that is generated by our system (for example: &s=1234567) or you have included an order search form on the Order Status page requiring zip code input, no further authentication will be prompted.
If you want the entirety of the page's content to be authentication protected, please contact your parcelLab representative.
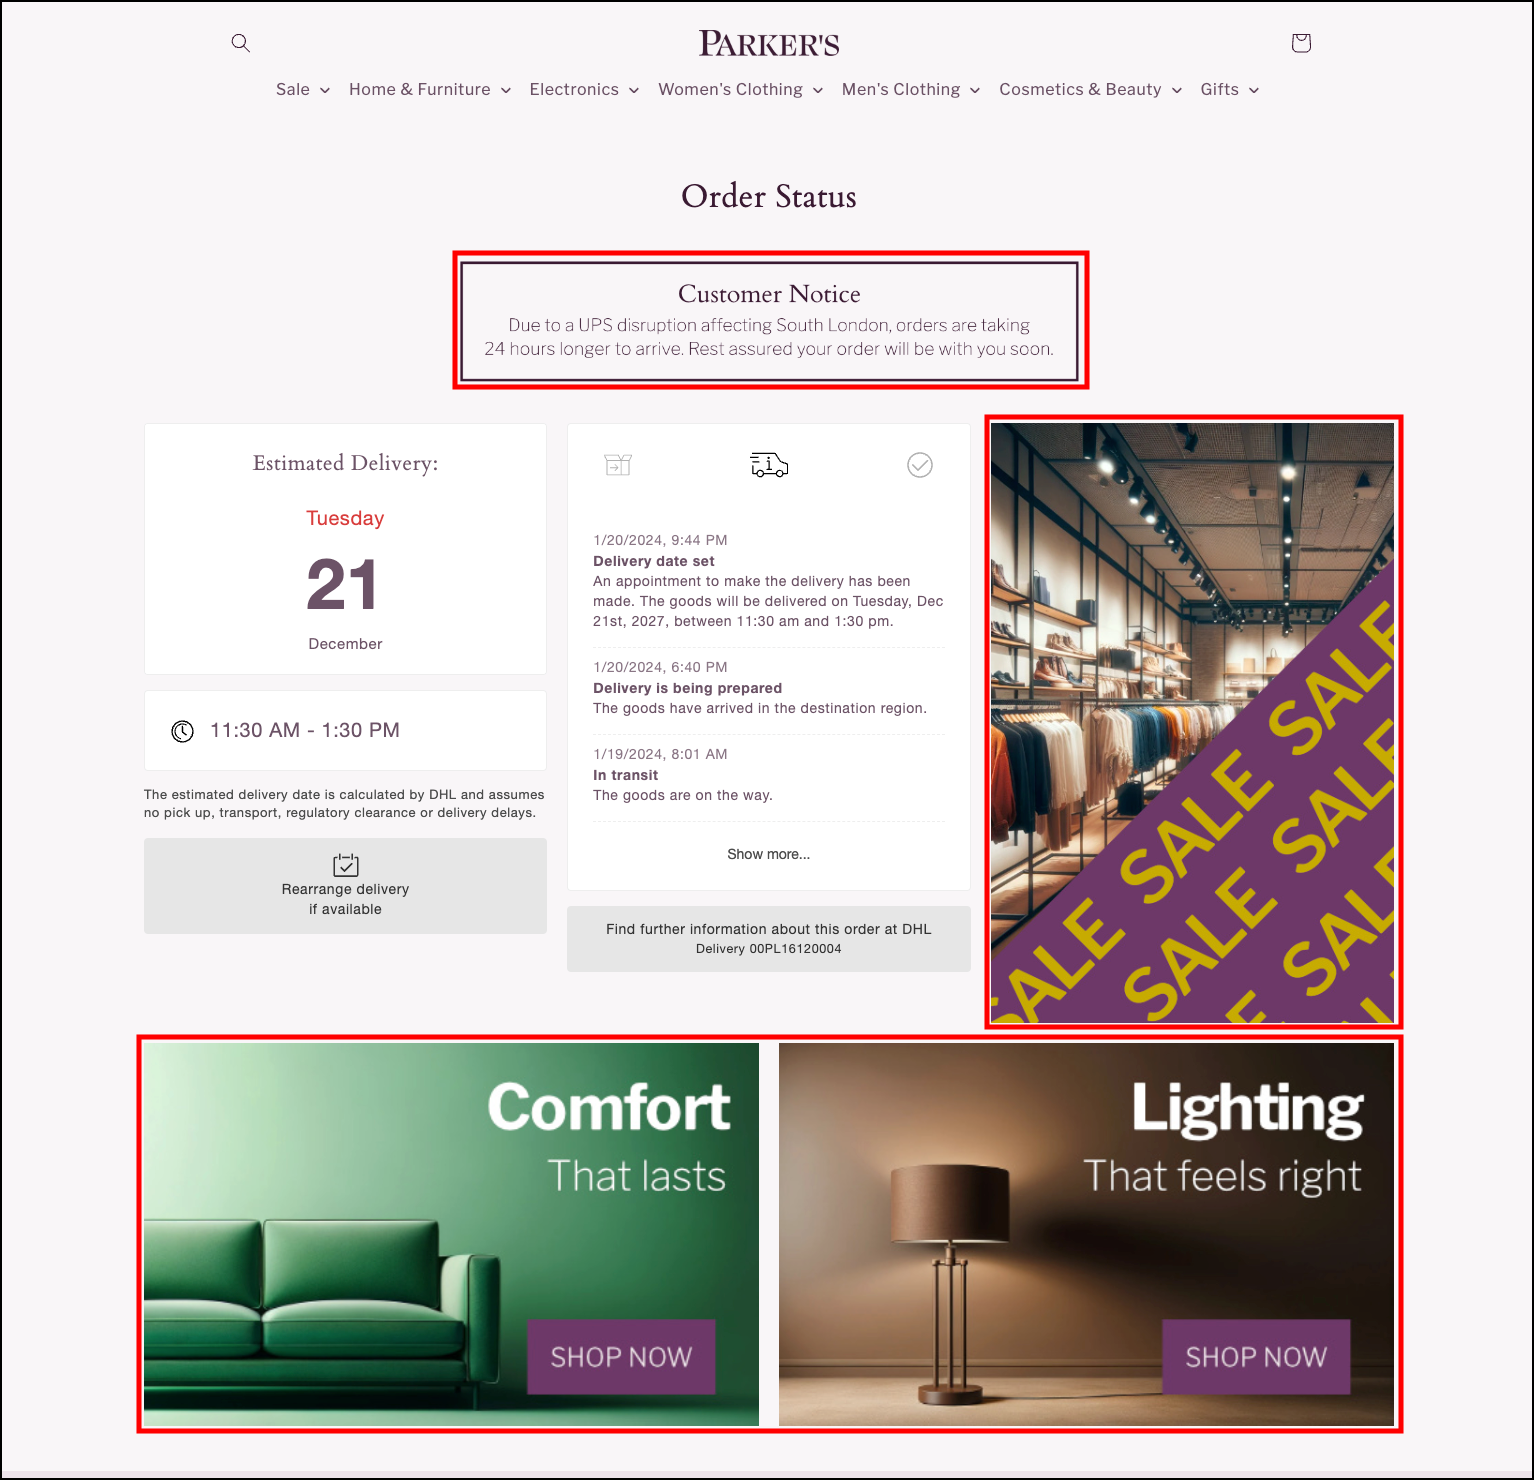
Campaign Banners
You can use the Campaign Manager module in the App to add and update campaigns that display banners on your Order Status page for a set period of time. This is especially useful for event-based marketing (for example: Black Friday and seasonal offers), feedback surveys, and information notices.
You must have a shop configured with the Order Status page V5 tracking snippet to publish campaign banners.
You can include campaign banners on the right-hand side of the Order Status page. You can also choose to add four other campaign banners at the top or bottom left/right-hand side of the page.
If you select to include one banner at the top or bottom of the page, the banner image will be centered rather than positioned on the left or right.
In order to activate a campaign, you need to do the following:
Create a new campaign in the Campaign Manager module in the App and publish it to the Order Status page.
Configured campaign banners will display on the Order Status page by default (that is: are active via use_campaign_banners: true in the JavaScript object).
You can deactivate campaign banners on the Order Status page using the use_campaign_banners option.
You can choose one of these methods to do it:
In the URL query parameters via
&use_campaign_banners=falseIn the JavaScript object via
use_campaign_banners: false
During the campaign period, the campaign banner will override the Order Status page's regular banner options as well as the Instagram plugin. If a campaign is active, the banner image and URL set via the banner_image and banner_link options will be ignored.
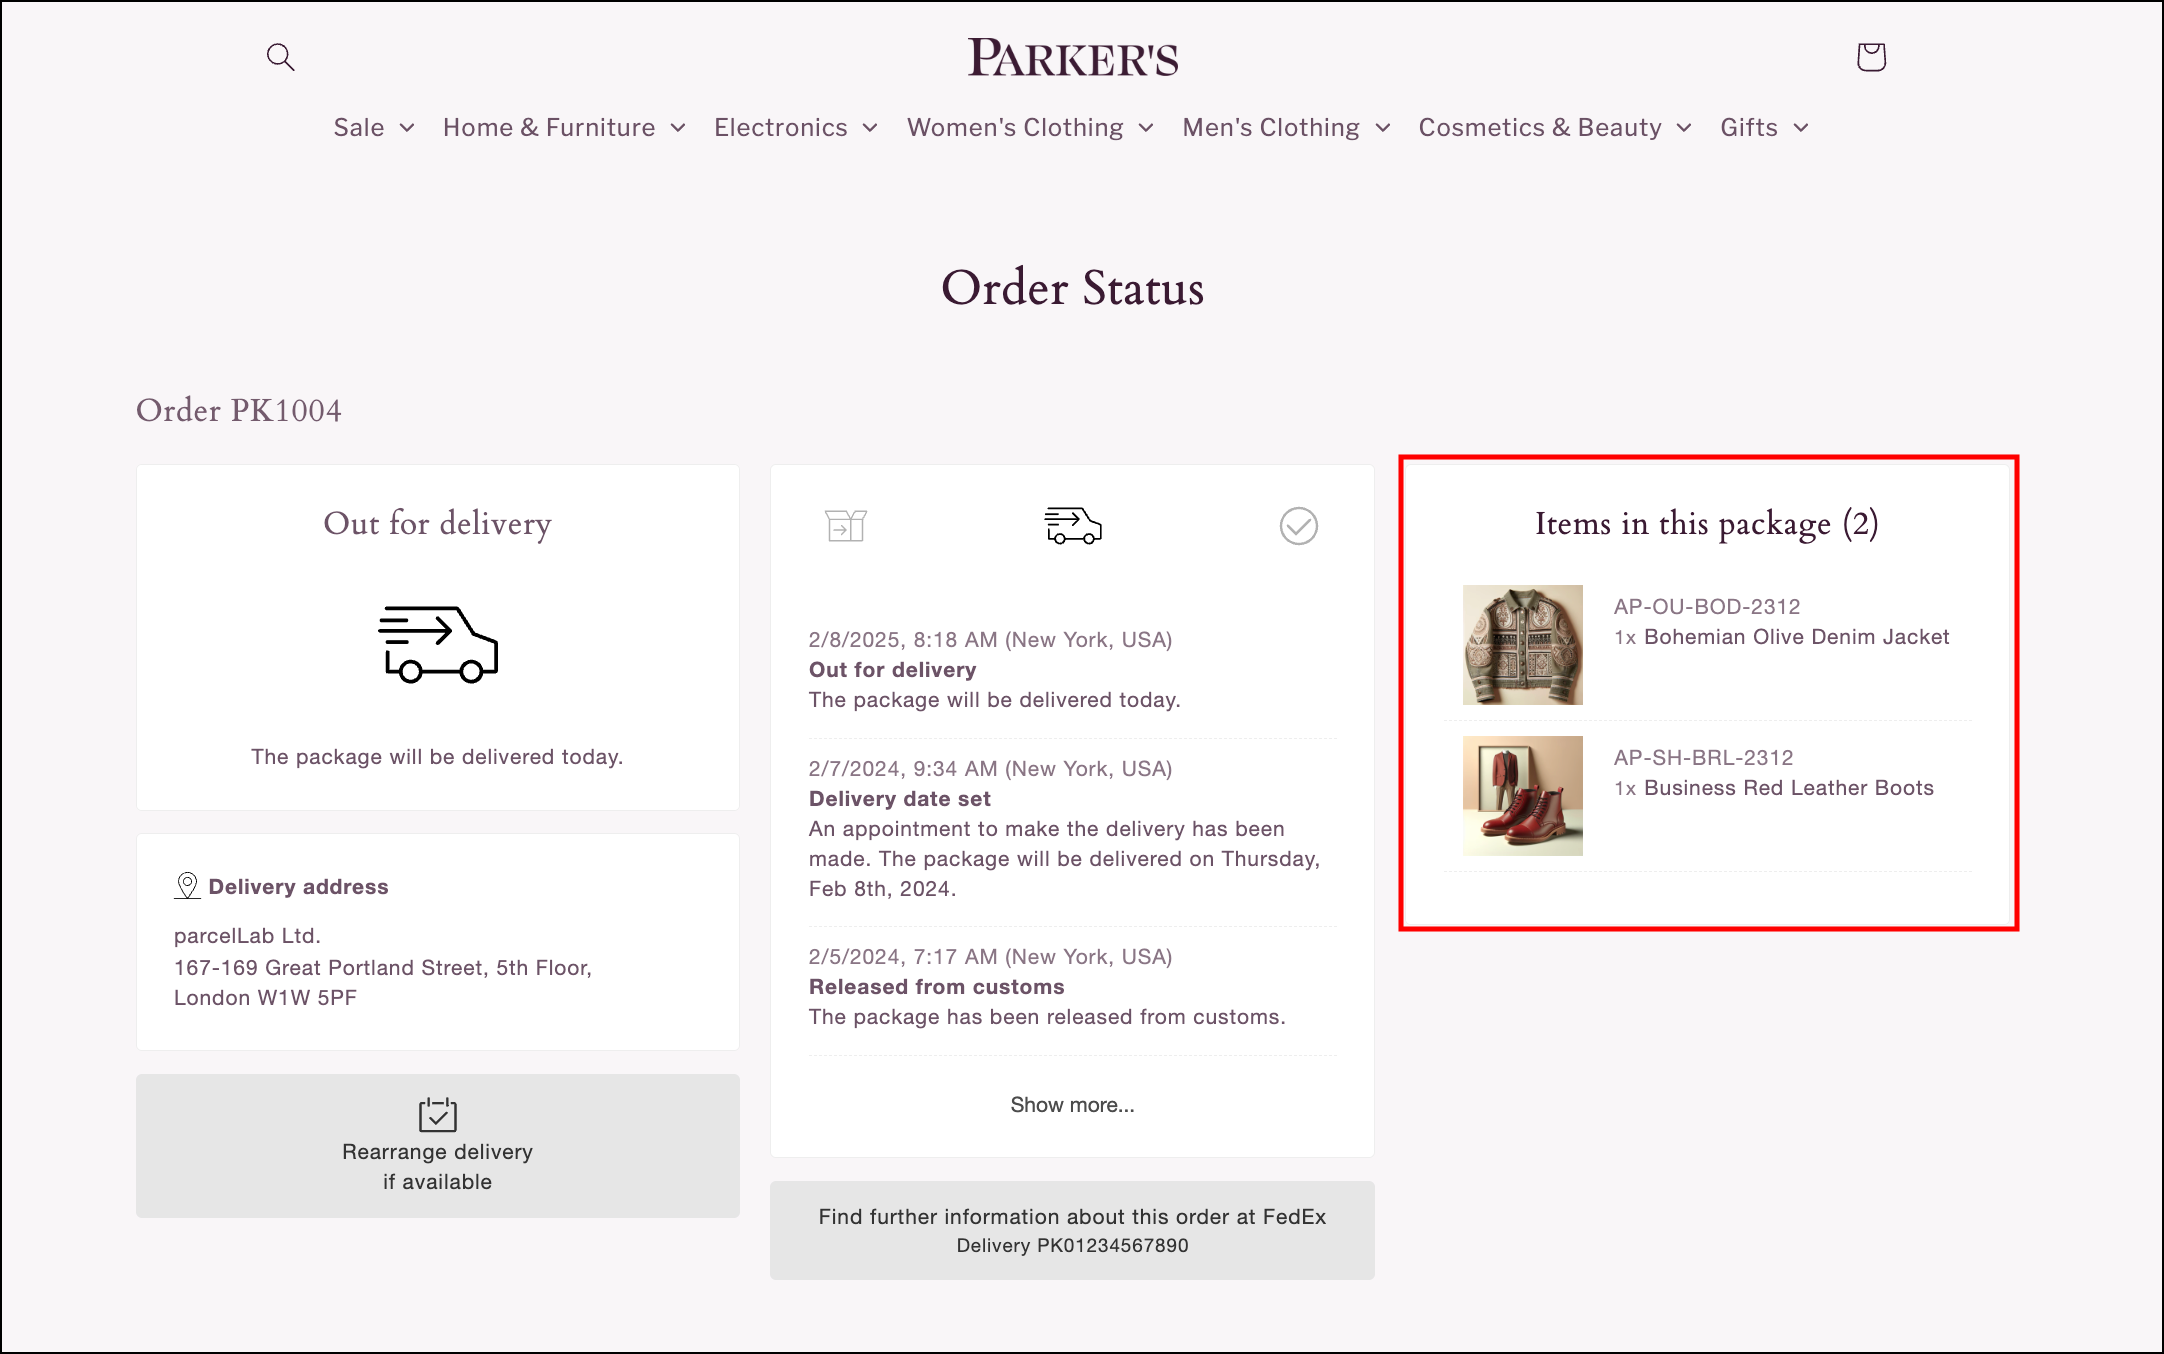
Article Lists
You can include a list of the purchased products in a package on the right-hand side of the Order Status page.
If there are more than four items in the article list, a Show More button is available to display the remaining items.
You can choose one of these methods to display an article list:
In the URL query parameters via
&show_articleList=trueIn the JavaScript object when loading via
show_articleList: trueVia a security hash or zip code in the URL query to retrieve the data
If you have a banner also defined (that is: the banner_image and banner_link are present in the URL query), then this has precedence in what is displayed on the right-hand side of the page. This means the banner will be displayed instead of the article list.
Styling
You can change the styles to suit your brand's needs by setting the customStyles.
The styles that can be set are described in the following table.
borderColor
The border color for the boxes.
#eee
borderRadius
The border radius for the boxes and buttons.
4px
buttonColor
The text color for buttons.
#333
buttonBackground
The background color for buttons.
#e6e6e6
iconColor
The color for the status icons.
#000
icon_theme
Enables holiday-themed status icons.
xmas or easter
liveMapBackground
The background color of the live tracking map footer.
0051BA
liveMapColor
The text color in the live tracking map footer.
ffffff
tabIconColor
The color of tab icons for multi parcel deliveries.
000
tabActiveIconColor
The color of the active tab icon for multi parcel deliveries.
000
Custom Styles Example
In this example, the box and button border-radius are set to 0px and the button color changed to black by setting the options object.
When setting customStyles via the URL query, the following validation applies:
Any
#must be removed from hex color codesAll content must be URI encoded (for example:
www.versand-status.de/?trackingNo=...&borderRadius=0px&buttonColor=FFF)
When setting custom styles in the JavaScript object, hex color codes can be used with or without #, as in the following examples:
window.parcelLabTrackAndTrace.initialize({ buttonBackground: '000' });
window.parcelLabTrackAndTrace.initialize({ buttonBackground: '#000' });
It is also possible to overwrite the CSS if needed but this is not the recommended approach.
If you want to use the plugin in a non-customer facing website (for example: an internal page for customer support), it is recommended to hide the action box.
Disable Voting Component
The voting component on the Order Status page is enabled by default. You can choose to disable a part of or the whole component using options that can be set in the URL or in the JavaScript object. These objects are described in the following table.
disableVoting
If set to true, disables the thumbs up/down voting feature on the Order Status page.
pwrdBy_parcelLab
If set to false, disables the parcelLab branding that is displayed in the thumbs up/down voting feature on the Order Status page.
Information Display
You can display additional information on your Order Status page using options that can be set in the URL or in the JavaScript object. These objects are described in the following table.
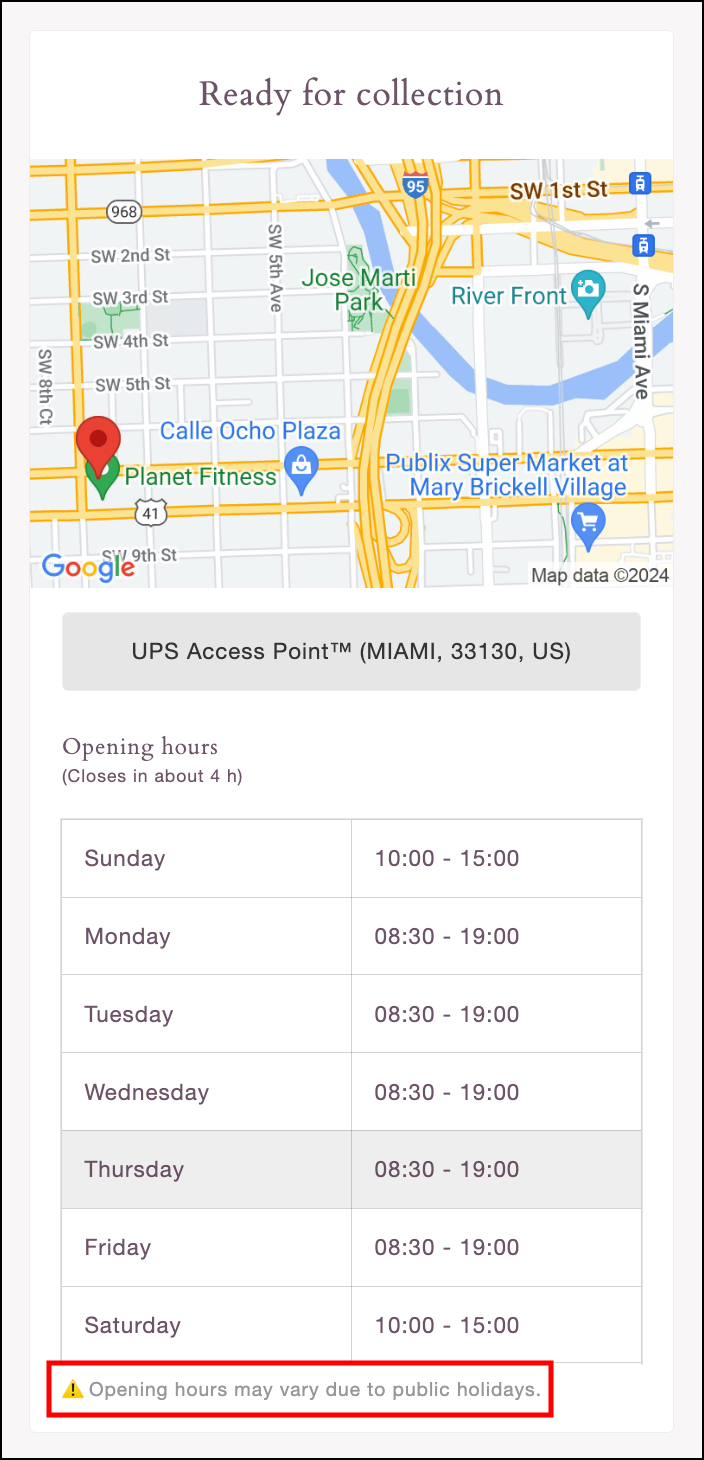
openinghrs_warn
Displays additional information for orders with the "ready for pickup" delivery status.
URI encoded text
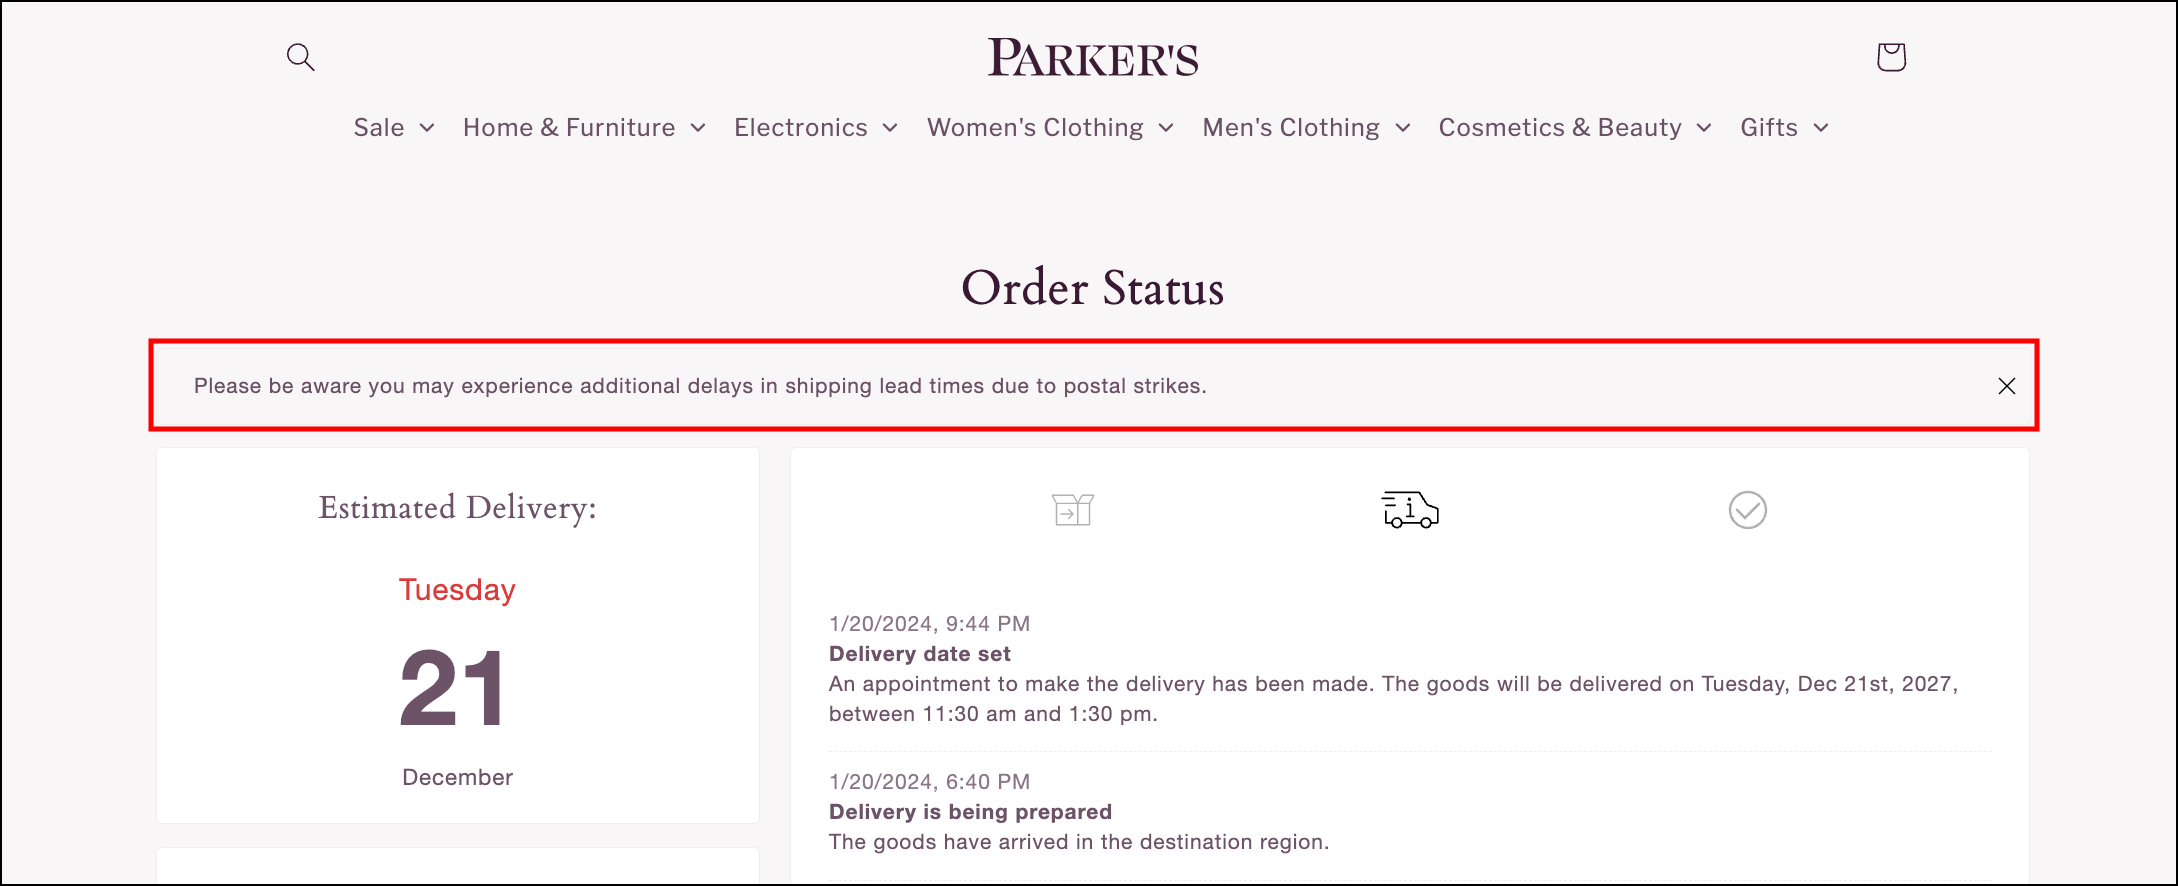
show_note
Displays a message at the top of the Order Status page.
URI encoded text
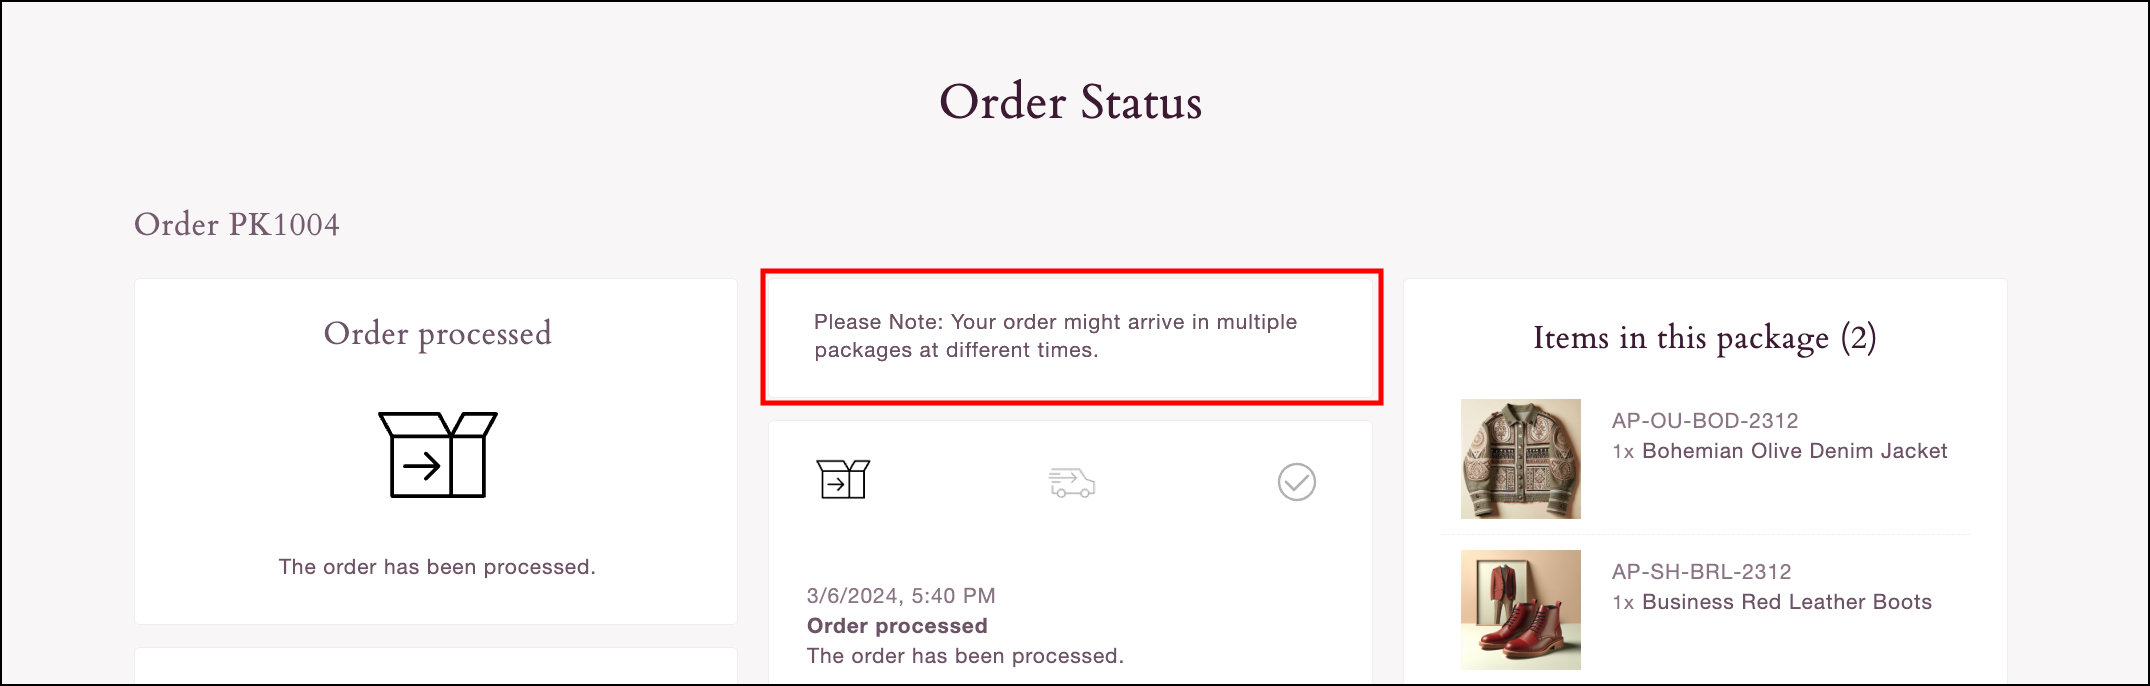
splitOrderWarning
Displays a warning for split order shipment.
URI encoded text
The openinghrs_warn option is available for orders with the "ready for pickup" delivery status. You can use this option to inform your customers about store or pickup location opening hours or any changes to operating hours.
You can use the show_note option to display a message at the top of the Order Status page. The note includes a close button that can be used to hide the displayed message.
The splitOrderWarning option must be used in conjunction with the option showArticleList=true. This can be used to warn customers that an order may consist of multiple deliveries. You can set your own message or display the default message by setting the value of the splitOrderWarning option as true.
SMS Opt-In
You can display an SMS opt-in field for customers to enter a phone number to receive delivery updates via SMS. You can activate the SMS opt-in component by adding the &smsOptin=true query to the URL or the snippet configuration.
The URL needs to contain a security hash generated by our system (for example: &s=123456789) in order to enable the SMS opt-in field.
The country is pre-set in the number input field based on the destination country of the delivery. If this information is unavailable, the country selector displays the first option in the list of countries.
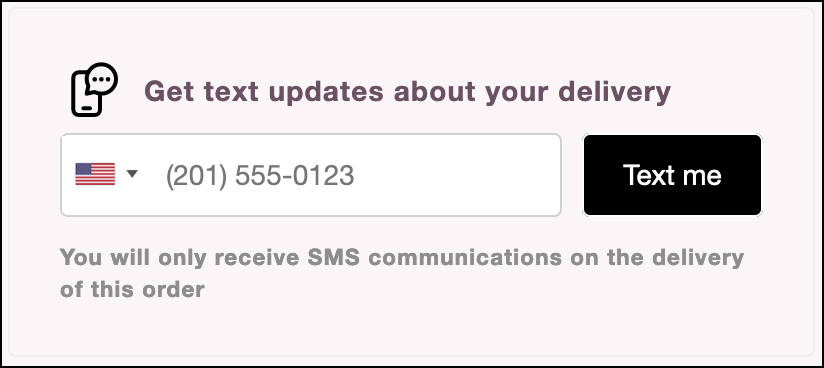
If a customer has already opted in to receive SMS notifications, a note will display confirming that they have already opted in.

In order for this feature to work, you also have to use the parcelLab SMS feature. For further information on integrating with parcelLab to send order status updates via SMS, see our parcelLab SMS documentation.
parcelLab SMSTrending Late Status
You can display a trending late status on your Order Status page to increase transparency around potential delivery delays to customers.
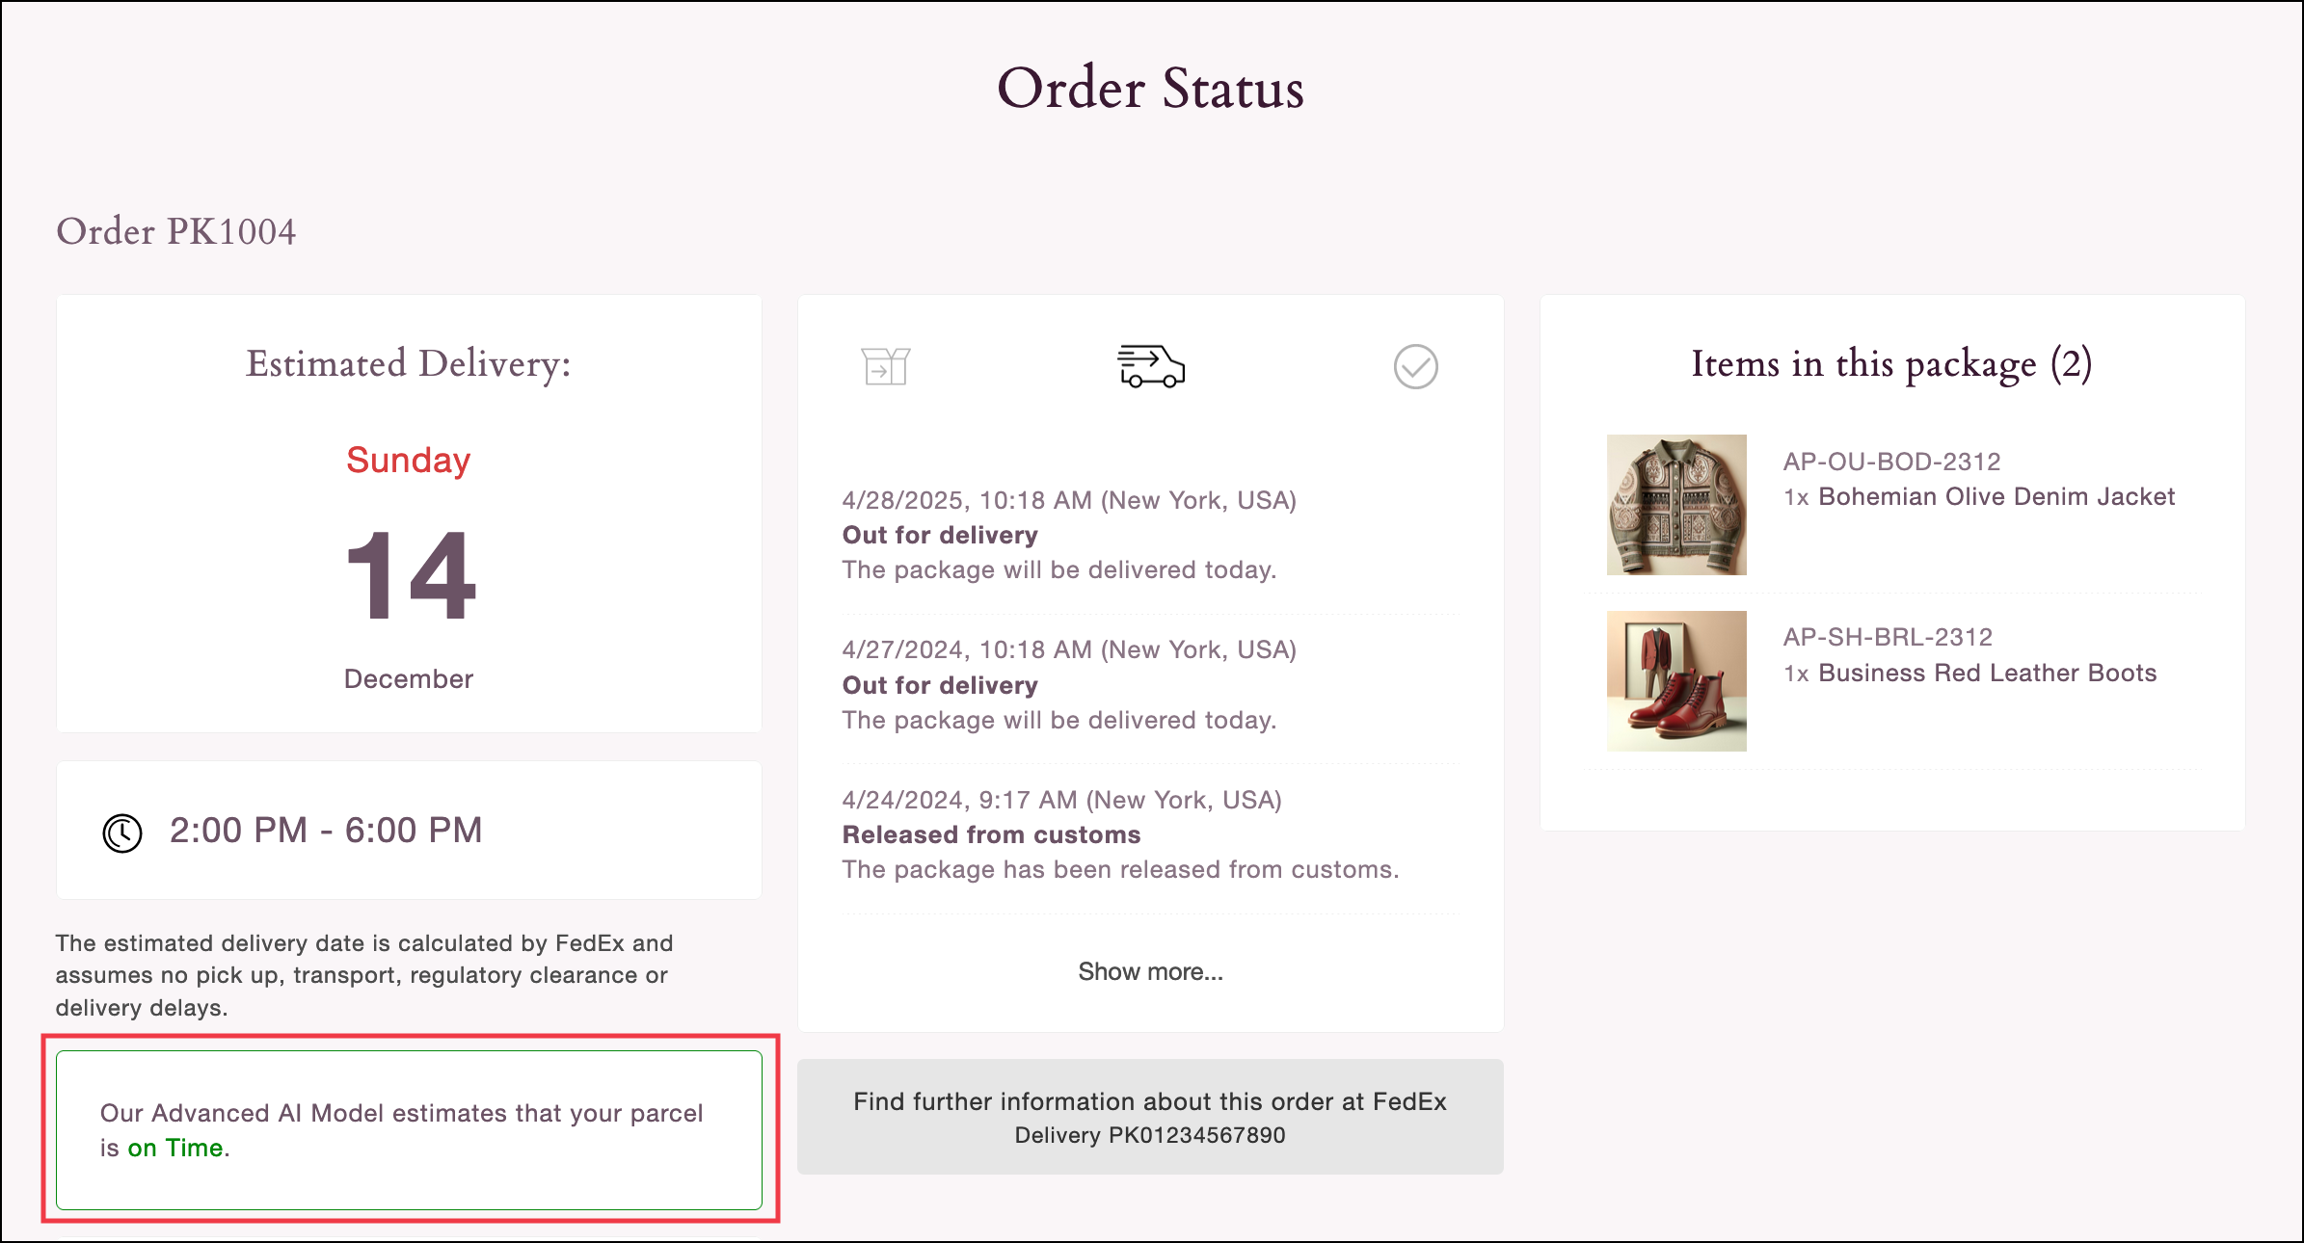
Trending late statuses are not displayed on the Order Status page by default.
You must be using parcelLab’s Trending Late feature and activate the display on your Order Status page.
You can activate the display of trending late statuses on the Order Status page using the show_trendingLate option.
You can choose one of these methods to do it:
In the URL query parameters via
show_trendingLate=trueIn the JavaScript object via
show_trendingLate: true
Programmatic Access
The selection of the tracking(s) to be displayed is typically performed through the URL but can also be done in code if required for the shop.
The options that can be used are described in the following table.
courier
The parcelLab carrier code.
dhl-germany
trackingNo
The tracking number.
0034000000001
trackingId
A unique tracking identifier assigned by parcelLab when your order data is received.
63a4cfe63dd87a685c8df7d4
plUserId
Your parcelLab user ID.
1612197
orderNo
The associated orderNo of the trackings.
ORD-123
selectedTrackingNo
When opening the page with userId/orderNo, select a specific tracking to be highlighted using the associated tracking number.
0034000000001
selectedTrackingId
When opening the page with userId/orderNo, select a specific tracking to be highlighted using the associated tracking ID.
63a4cfe63dd87a685c8df7d4
The selectedTrackingId option can be used to display trackings on the Order Status page in cases where trackings have yet to be assigned a tracking number.
Using with UI Frameworks
When you need to use the plugin with a UI Framework (for example: React, Vue, Next, and Nuxt), consider the NPM package. It exports a React and Vue component, which you can simply integrate in your existing app. For further information, see the usage examples in the NPM Readme.
Alternative Configuration
You can use the following alternative configuration for your Order Status page:
Include the CSS and JavaScript manually
Install with shop systems
The code is also available as open source on GitHub. Feel free to fork or clone, change and host, or create pull requests.
Last updated
Was this helpful?